


In this post, we will look at steps to upgrade to Configuration Manager 1511. With the release of SCCM 1511, Microsoft allows you to run an in-place upgrade to configuration manager 1511 from a SCCM 2012 R2 site.
When you upgrade to SCCM 1511, you get the new features and improvements to your site. The bugs existing in the current version of SCCM are addressed in ConfigMgr 1511 update.
Before you upgrade to SCCM 1511, you must prepare sites which requires you to remove specific configurations that can prevent a successful upgrade, and then follow the upgrade sequence when more than a single site is involved. You can read following guide for steps to install Configuration Manager 1511.

In this article, we will walk you through the steps for in-place upgrade to SCCM 1511. This includes the details about the upgrade paths available, upgrade checklists and the procedure to upgrade to Configuration Manager 1511. The SCCM 1511 can be downloaded from the Microsoft Evaluation Center, MSDN, and Volume Licensing Service Center.
Configuration Manager 1511 Upgrade Checklist
The following checklist can help you plan a successful upgrade to SCCM 1511.
- Ensure that your computing environment meets the supported configurations that are required for upgrading to ConfigMgr version 1511.
- Review the site and hierarchy status and verify that there are no unresolved issues.
- Install all applicable critical updates for operating systems on computers that host the site, the site database server, and remote site system roles.
- Uninstall the site system roles not supported by System Center Configuration Manager.
- Disable database replicas for management points at primary sites.
- Reconfigure software update points that use NLBs.
- Disable all site maintenance tasks at each site for the duration of that site’s upgrade.
- Run Setup Prerequisite Checker.
- Download prerequisite files and redistributable files for Configuration Manager.
- Plan to manage server and client languages.
- Review considerations for site upgrades.
- Create a backup of the site database at the central administration site and primary sites.
- Test the database upgrade process on a copy of the most recent site database backup.
- Restart the site server and each computer that hosts a site system role to ensure that there are no pending actions from a recent installation of updates or from prerequisites.
- Upgrade sites starting at the top-level site in the hierarchy and working down (CAS > Primary > Secondary).
Note: When you upgrade a site in a hierarchy, you start the upgrade from top-level site of the hierarchy first. This top-level site is either a central administration site or a stand-alone primary site. After the upgrade of a central administration site is completed, you can upgrade child primary sites in any order that you want. After you upgrade a primary site, you can upgrade that site’s child secondary sites.
Additional Prerequisites
- Windows 10 ADK must be installed. Take a look at the latest ADK versions for Windows 10.
- Download and install hotfix KB3095113 on your SUP before you start the upgrade. This hotfix enables Windows Server Update Services (WSUS) on a Windows Server 2012-based or a Windows Server 2012 R2-based server to sync and distribute feature upgrades for Windows 10. This hotfix is not required to enable WSUS to sync and distribute servicing updates for Windows 10.
Backup Configuration Manager Database
Before we start the upgrade process, you need to perform 2 important steps:
- Backup Configuration Manager Database: Before you upgrade a site, back up the site database to ensure that you have a successful backup to use for disaster recovery. Check this post for steps to backup SCCM DB.
- Perform test upgrade of DB: Before you upgrade a site, test a copy of that site’s database for the upgrade. You can refer to the following guide to perform test upgrade of database.
Upgrade to Configuration Manager 1511
Let’s look at the steps to upgrade to SCCM 1511. Mount the Configuration Manager ISO file and run the file splash to launch the Setup screen. Click on Install to begin the SCCM 1511 Installation.

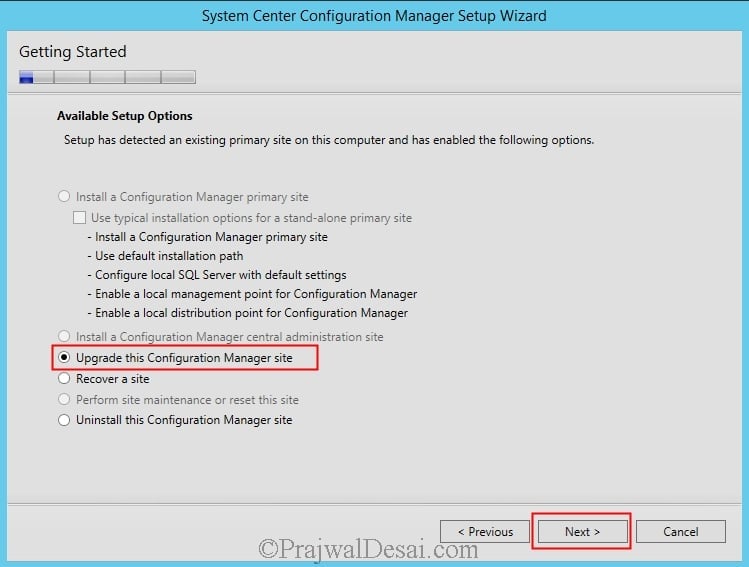
Click on Upgrade this Configuration Manager site and click Next.
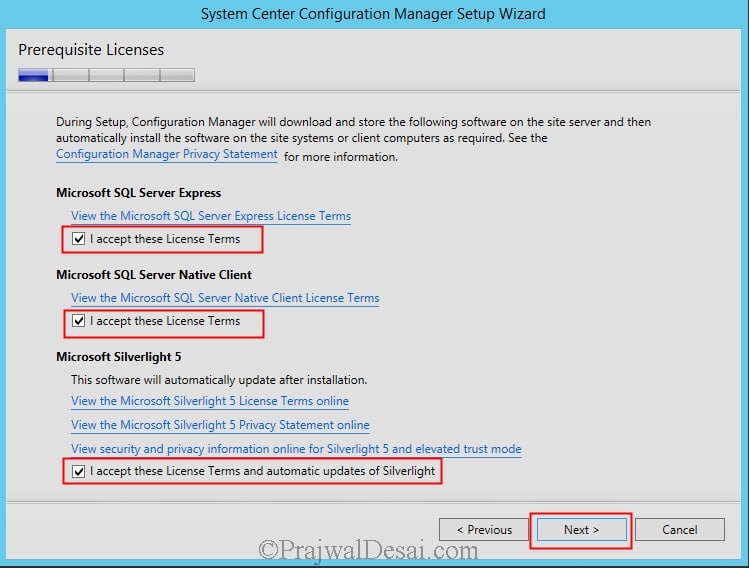
Accept the license terms for Microsoft SQL Server 2012 Express, SQL Server Native Client and Silverlight 5 and click on Next.
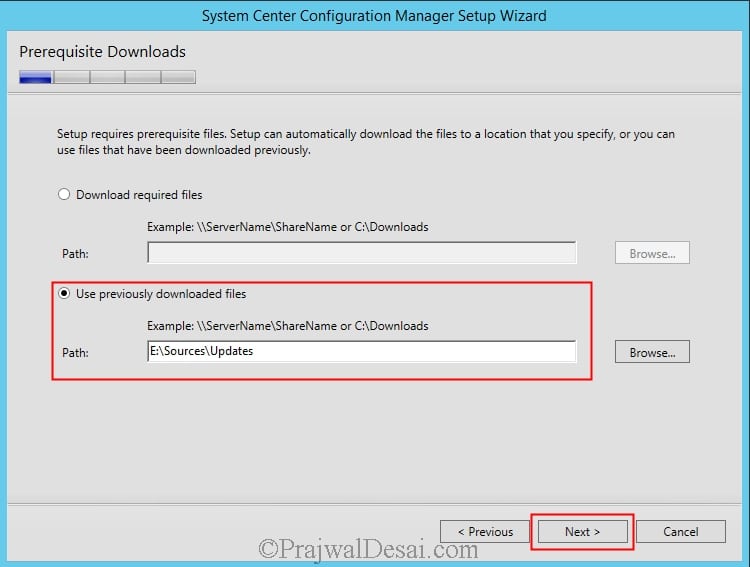
Prerequisite Downloads – There are 2 options that we see here.
- Download required files: Select this option to download the setup prerequisites from Microsoft and you can store them in a folder or shared path.
- Use previously downloaded files: Select this option if you have downloaded the prerequisites. Browse to the folder where the prerequisites are stored and click on Next.
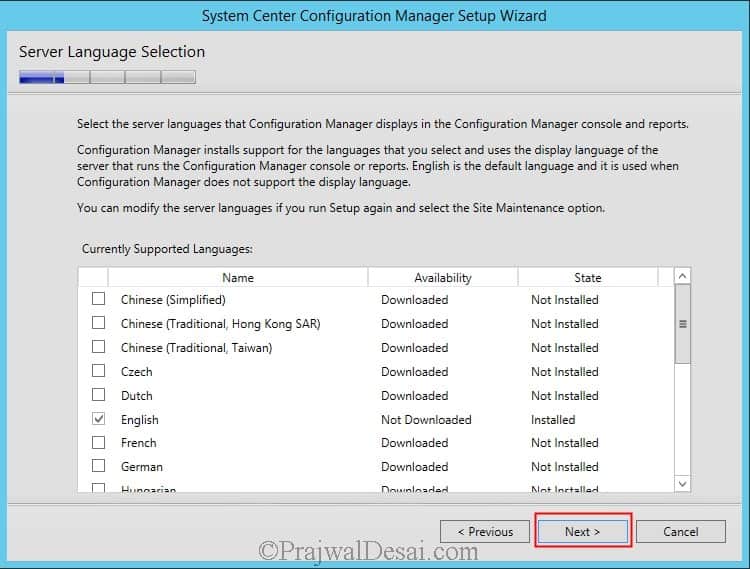
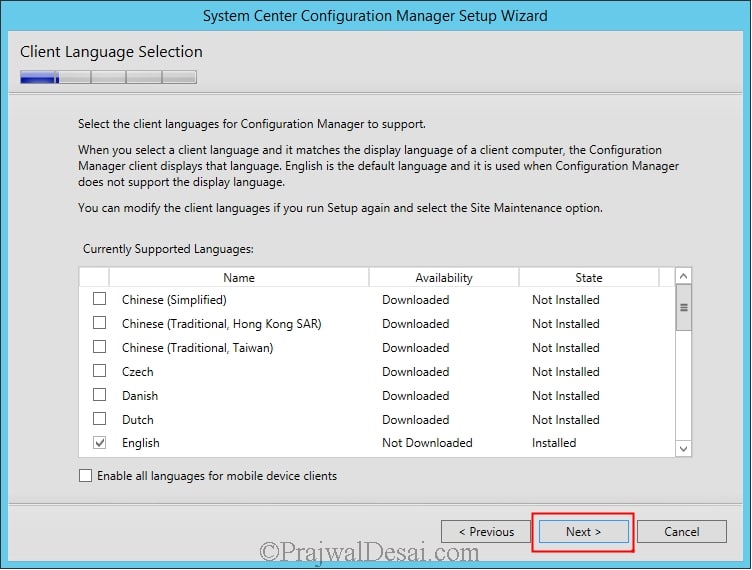
Select the server language and typically, it’s English. You may select multiple server languages that Configuration Manager displays in the console and reports. Click Next.
Click on Next.
On Usage Data window, click on Next.

On the Settings Summary page, we see the Upgrade under Component Details. Click Next.

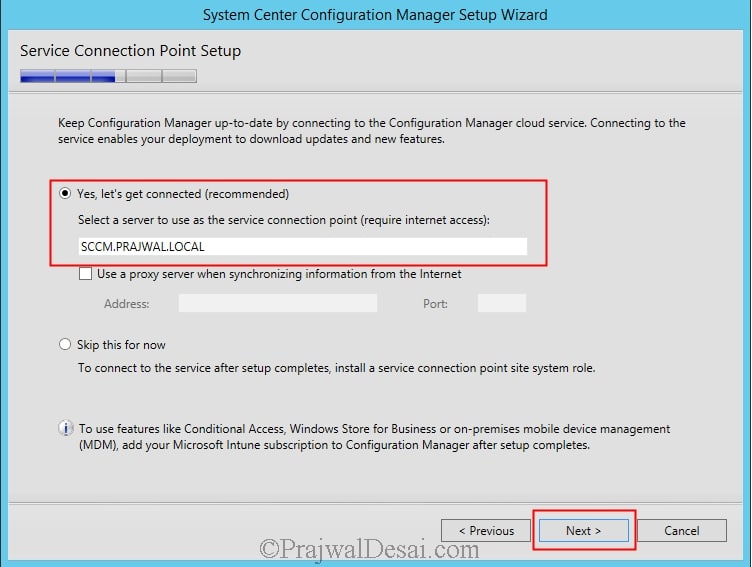
On the Service Connection Point Setup page, click on Yes, let’s get connected and click Next.
During the SCCM Prerequisite Check step, the Configuration Manager setup checks whether all prerequisites are installed correctly. If any of the prerequisite is not installed or missing, it is displayed on the screen.
If all the prerequisites are installed correctly, then you will see the message “All prerequisites rules pass successfully”. Click on Begin Install.

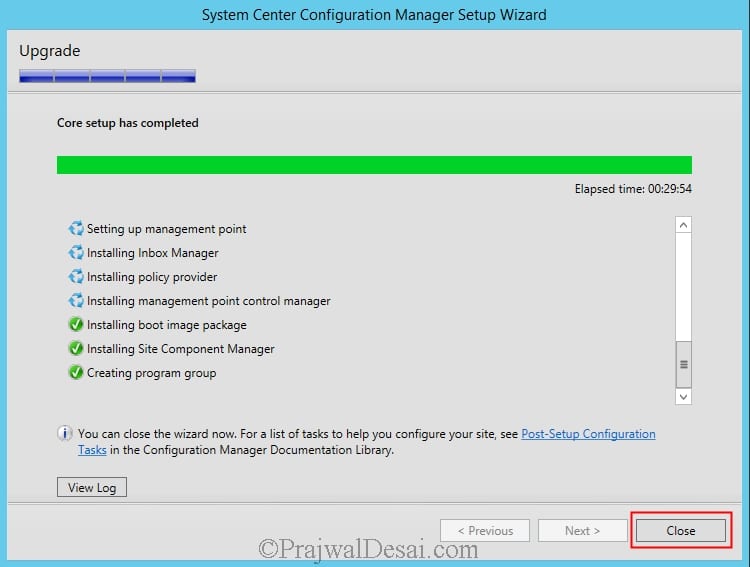
The Configuration Manager update 1511 installation begins now. You need to wait until the upgrade is complete. I observed that not all components are seen with green tick. I had to wait for around 15 minutes to see all the components installed. Click Close.
Monitor SCCM 1511 Upgrade
There are two ways to monitor SCCM 1511 upgrade. You can either view the log files or go to Monitoring workspace in the Configuration Manager to view the update installation progress.
You can view the ConfigMgrSetup.log file with a tool called CMTrace. This log file is located on the root drive of Configuration Manager server. Take a look at all the SCCM log files.
The CMTrace tool is located in Configuration Installation Media under SMSSETUP > TOOLS. Launch the CMTrace tool, open the log file ConfigMgrSetup.log located on C: drive.
The line Completed Configuration Manager 2012 Server Setup – Upgrade confirms that Configuration Manager 1511 upgrade is successful.

After the setup is complete, open the SCCM Console, and launch About Configuration Manager. The Console has version 500.8325.1000 and ConfigMgr Version is 1511.
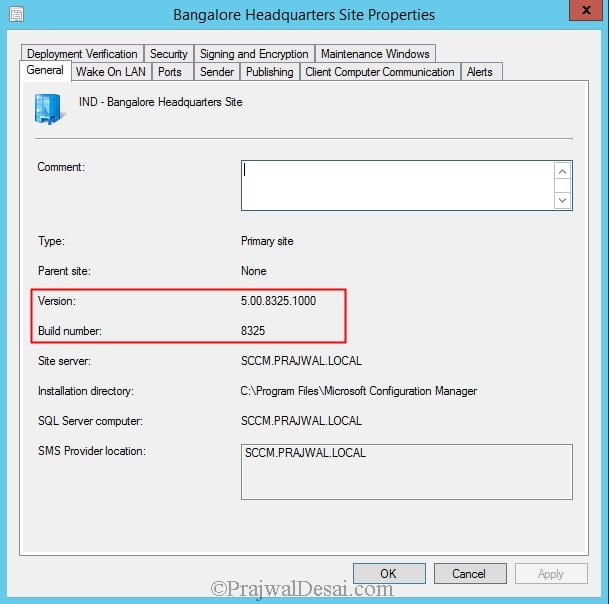
You can also click on Administration > Overview > Site Configuration > Sites > right-click on your site and choose Properties. On the General tab, you will see Version = 5.00.8325.1000 and build number = 8325.
Check out all the updated SCCM build numbers and console numbers.
SCCM 1511 Client Upgrade
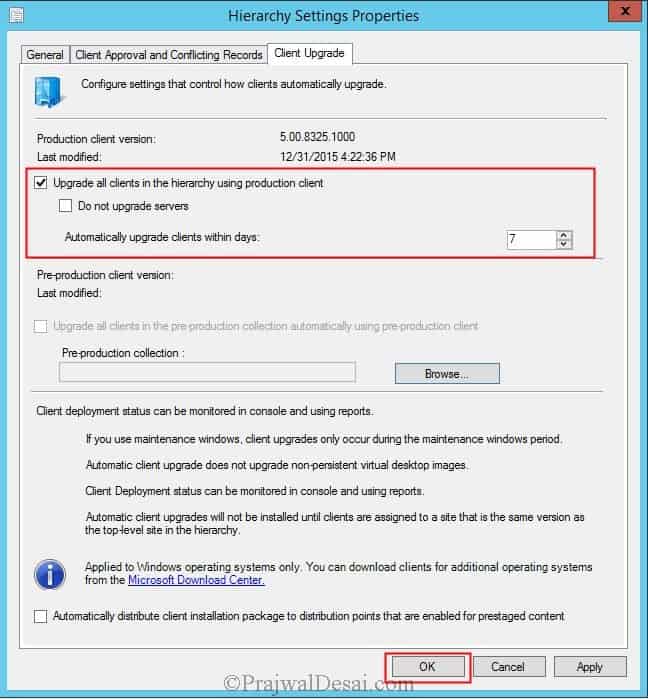
After you install SCCM 1511 update, the next step is to upgrade the clients. You could make use of Client Upgrade feature which does the upgrade job easy for you. To enable this feature, go to Administration > Site Configuration > Select Sites. Click on Hierarchy Settings and go to the Client Upgrade tab.
In the Client Upgrade tab, click on Upgrade all clients in the hierarchy using production client. Set Automatically upgrade clients within days to 7 (default). Click OK.
The second option that we see is Pre-production client version. For upgrading the Configuration Manager client on Windows PCs and devices, you can test a new client version in a pre-production collection before upgrading the rest of the site with it.
When you do this, only devices that are part of the pre-production collection upgraded to the new client. Once you’ve had a chance to test the client in this pre-production collection, you can promote the client, which makes the new version of the client software available to the rest of the site.

i want to know that, after upgrading SCCM to 1702 and enabling the automatic client upgrade, will IBCM clients upgrade automatically (connected over internet) or need to install new client manually ???
OR
is it compulsory that IBCM clients need to come in intranet or manual installation of upgraded / new client????
Hello,
I was wondering if, after installing the upgrade on the Primary Site Server, if this will automatically upgrade all Site System Servers within this site. If not, is there a manual way to upgrade the Site System Servers so that we do not loose our two extra Distribution
Yes you can upgrade sccm 2012 R2 SP1 directly to 1606. I will be coming up with a post on this shortly. If you are licensed to use 1511 then during the upgrade it won’t prompt for entering license key.
Thanks for the reply. we are awaiting for your post about the direct upgrade.
I am working on it..
query to find out non sccm 1511 client agents –
select SMS_R_SYSTEM.ResourceID,SMS_R_SYSTEM.ResourceType,SMS_R_SYSTEM.Name,SMS_R_SYSTEM.SMSUniqueIdentifier,SMS_R_SYSTEM.ResourceDomainORWorkgroup,SMS_R_SYSTEM.Client from SMS_R_System where SMS_R_System.ClientVersion != ‘5.00.8325.1000’
Hi Prajwal,
Really the above information is helpful. However am having the queries below.
1. We are planning to migrate from SCCM 2012 R2 to 1511 & then 1606, but i heard like there is possible to directly upgrade to 1606 instead of 1511. So could you please advise me and share your inputs on this.
2. While performing the SCCM 1511 upgrade whether it will prompt for license key and do we need to download setup files from MS volume license site. Am i right please.
Hi Prajwal, We’re looking to upgrade from SCCM 2012 R2 SP1 to SCCM 1606. I already understand that we’ll need to upgrade to SCCM 1511 first and then to SCCM 1606, but I’m hoping we don’t have to update all our existing console and clients twice to do this. Can you go from SCCM 2012 R2 SP1 client and consoles directly to SCCM 1606 client and consoles?. Don’t want to wait after SCCM 1511 upgrade for clients to update to 1511 before we go to SCCM 1606.
That’s correct – You can now upgrade from SCCM 2012 SP2 or R2 SP1 straight to Current Branch 1606 -https://blogs.technet.microsoft.com/enterprisemobility/2016/10/12/configuration-manager-a-progress-update-on-the-current-branch-and-a-new-servicing-branch/
The upgrade paths are listed here – https://www.prajwaldesai.com/sccm-2012-r2-sp1-upgrade-guide/
Hi Prajwal, could you please let me know upgrade path for ConfigMgr 2012 R2,
5.00.7958.10007958 into SCCM 2012 SP1 and then SP2. also is it require to upgrade CU.
Hi Craig, I haven’t tested this. I will get back to you with a answer on this. Please wait.
Hello Prajwal,
This article was very helpful to me. i upgraded our SCCM 2012 SP1 to SCCM V1511.
Will work with it to be sure all is well if not i will run here for help.
Kudos. will like to find out if your have a facebook group of if you are on twitter.
i’m very impressed.
Glad to hear that it helped you. You can follow me on twitter @PrajwalDesai.
If you have got SCCM related questions, feel free to post it on community forums
thanks a lot. please bail me out.
Please will like to know if you have come across this issue on security update deployment on windows server 2012r2
i deployed security update via sccm and it recorded complaint for all the windows servers 2012 rs but when i log in to the servers the updates are not recorded on the add and remove programs.
why does SCCM behave that way for windows server 2012r2 because windows server 2012 and 2008 r2 shows the update deployed via sccm.
Hi Prajwal,
We are planning to upgrade 1511, our existing environment(SCCM 2012 R2 SP1) we use SCUP to manage Adobe security patches. Please let us know whether SCUP will work after upgradation to 1511. And also help in understanding the pre-requisite KB3095113.
Hi Babu Raju, I have not tested this yet. When i will that, i will let you know.
Babu or Prajwal,
Is there any feedback on this question? Does SCUP still work after the upgrade?
Cheers
Craig
Hi Prajwal,
We are planning to upgrade 1511. In our existing environment(SCCM 2012 R2 SP1) we use SCUP to manage Adobe security patches. Please let us know whether SCUP will work after upgradation to 1511. Also i m not getting licensed setup from Microsoft volume license site, can i use the evaluation version. If i m running the setup it’s not asking for any key.
Hi Prajwal Desai, our SCCM version is 2012 R2 SP1, I’d like to upgrade to 1511, but I cannot find or forgot previously downloaded files path, and then I try Download required files. no show setup type is upgrade screen, please advise, thx.
Hi, Prajwai, I know what happened, thx.
You can download the prereq files on any machine. Once you download copy the folder over to the SCCM server. Then proceed with the upgrade. If you are unable to see the upgrade option, reboot the server and try once.
Hi, I have already installed the ADK 1511 and just noticed that MS recommends NOT installing it. What would be the best process of going back to the older version? Can I just remove the new one and reinstalled the old version without screwing things up?
That should be fine.
To do the test upgrade on the database it says you need the same edition of SQL. Does it need to be the same version? For instance my SCCM 2012 uses a SQL 2012 Standard but I have another SQL Server that runs SQL 2008 Standard. If this is just going to be a test I kind of would like to avoid having to build another SQL Server temporarily.
If its same version it would be great. If not it’s till okay as far as the SQL version is supported by CM.
Hello! after updating to SCCM 2012 R2 1511 (5.0.8325.1000) the “Company Resource Access” in “Assets and Compliance”/Compliance Settings is missing. Any ideas?
Hi Prajwal and thanks for the information. After upgrading to 5.0.8325.1000 the “company resource access” is missing from the compliancy settings in Assets and compliance. The upgrade went smooth- did i miss something?
for Perform test upgrade of DB, if I have deployed sccm in hyper-v and in that case if i take a checkpoint of my sql server and all sccm servers before i upgrade, will it be safe or do i need to Perform test upgrade of DB any how. ????
Since the update, Failed to get DP locations as the expected version from MP ‘xxxxxxxxxxxx’. Error 0x87d00215
Please post this question in forums.
My site System Server has the old client and didn’t upgrade tot he 1511. Is there something manual or auto I can set to fix this issue?
if you are running sccm 2012 sp1 and it is connected to sql 2008 sp1 you do not need to install any patches or updates correct?
I did my research and test and i do not believe so but i am running past you 🙂 since you know all about sccm
I would say not to install any updates. These Cumulative Updates / Patches can cause issues. If you want to keep the SQL updated, take a complete back up of DB, SCCM server and then test the updates installation.
thank you for the post.
After you upgrade to sccm 1511
do the sccm clients needs to be upgraded as well?
if so after the clients have been upgraded do those clients need a reboot?
Yes the client agents needs to be upgraded. No reboot is required after the client agent upgrade. To upgrade the client agents, make use of Automatic Client Upgrade feature.
Select your Site and select Hierarchy Settings in the top ribbon > Go to the Automatic Client Upgrade tab
> Check Upgrade client automatically when new client updates are available and press OK in the window that pop ups.
Hi, We have successfully upgraded our SCCM 2to version 1511. We have deployed admin console to several machines within our team. Would you please advice the best practice to upgrade the admin consoles too.
Thanks
Yes you need to upgrade the consoles. Other wise its not possible to access the higher version of the configmgr.