

Deploying Windows 7 Using SCCM 2012 R2 n this post we will see the steps for deploying windows 7 using SCCM 2012 R2. In my previous post we saw the steps to capture a reference operating system (Windows 7) using SCCM 2012 R2. Note that this post is different from the one which shows the steps to build and capture the operating systems using SCCM 2012, we will not be using build and capture approach here rather we will capture a reference operating system, i.e. capture windows 7 using SCCM 2012 R2 and we will deploy the same using SCCM 2012 R2 in the this post. We will be creating a device collection first and then we will import the computer information to this device collection. One the computer is added to the collection we will create task sequence, configure it and deploy it the device collection.
Deploying Windows 7 Using SCCM 2012 R2
So in my previous post we had successfully captured the windows 7 operating system and now we will be deploying the captured image using SCCM 2012 R2. To do that lets create a blank virtual machine without any operating system installed on it. Note down the MAC address of the virtual machine (the same applies to a physical box too).

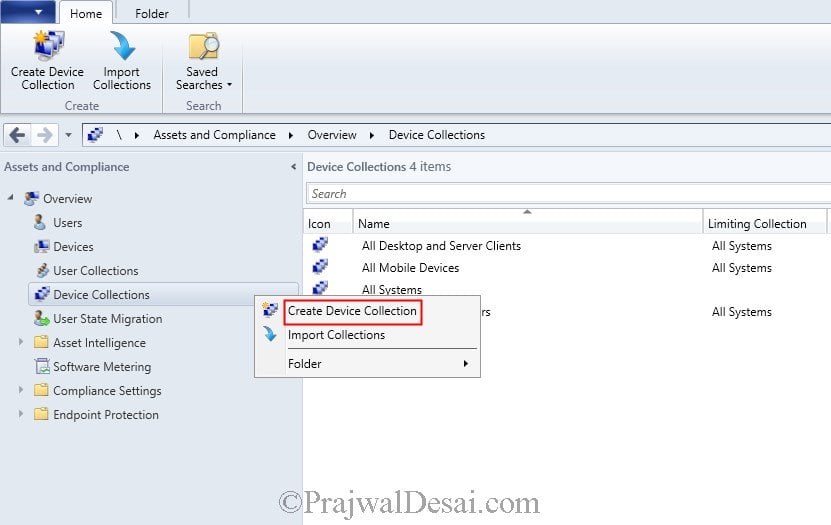
Lets create a new device collection. This is to add the computer to this collection for which the operating system is going to be deployed. Right click on Device Collections, click Create Device Collection.
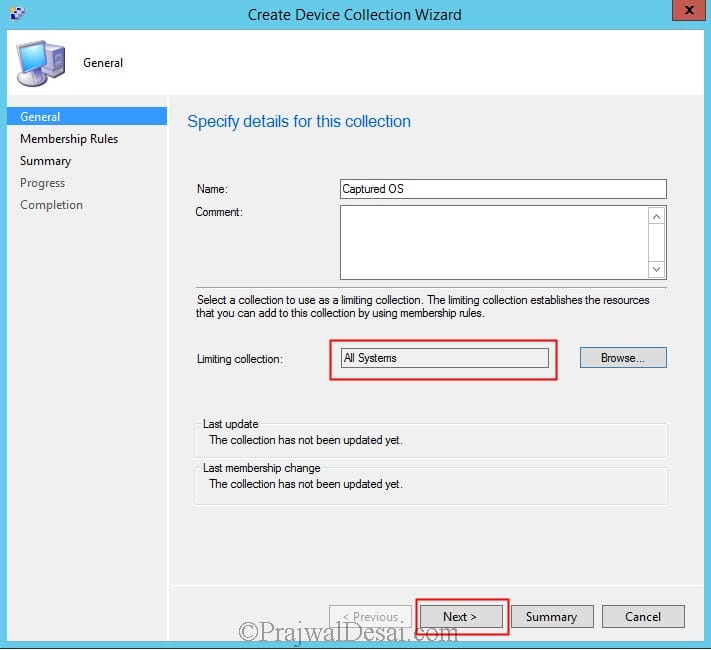
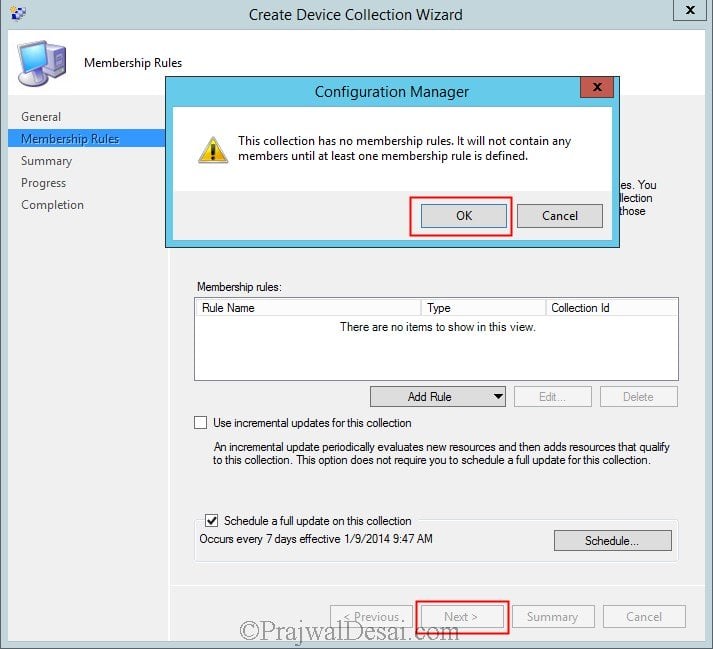
Provide the name for this collection , set the Limiting collection to All Systems. Click Next.
We will not define any rules for this collection. Click on Next. Since we will be creating a collection without defining any rule, the wizard prompts that the collection will not contain any members until we define a membership rule. On the pop up box click on OK.
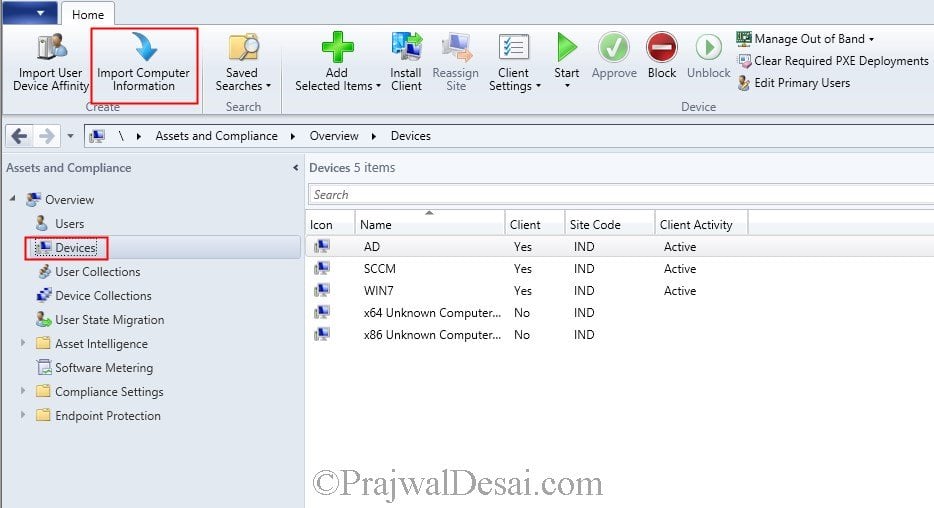
The device collection has been created. Now we will import the computer information to add the new computer object to this collection. Click on Devices, click on Import Computer Information.
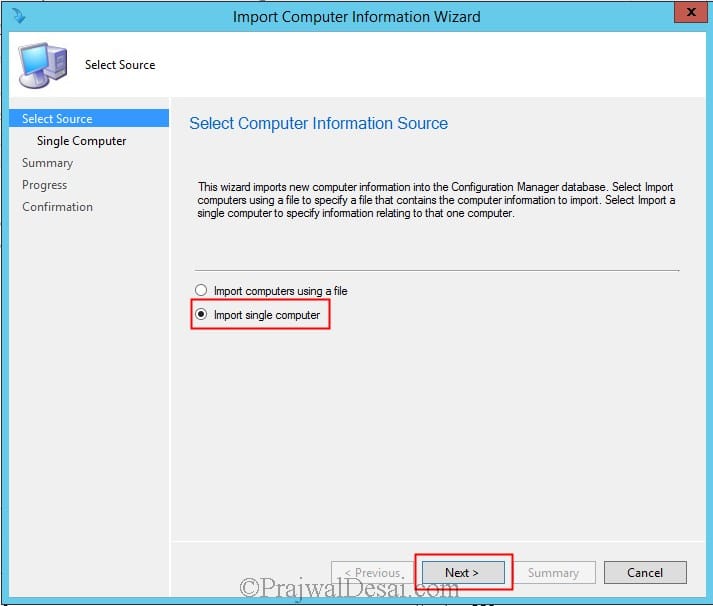
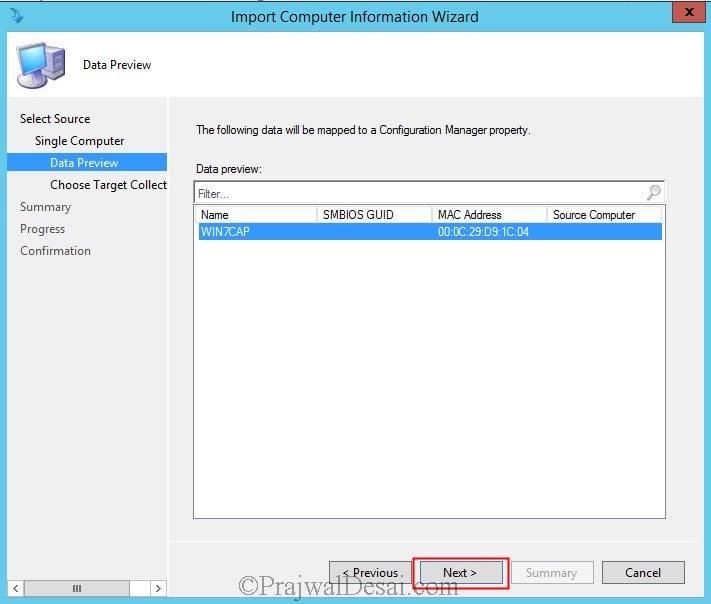
Choose Import single computer and click Next.
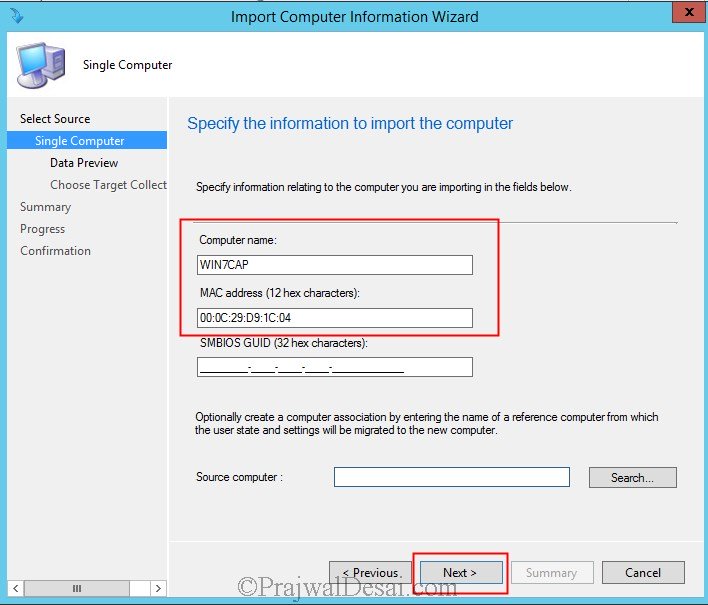
Specify the Computer name, MAC Address of the computer (MAC address of the computer where the OS is going to be deployed) and click Next.
Click Next.
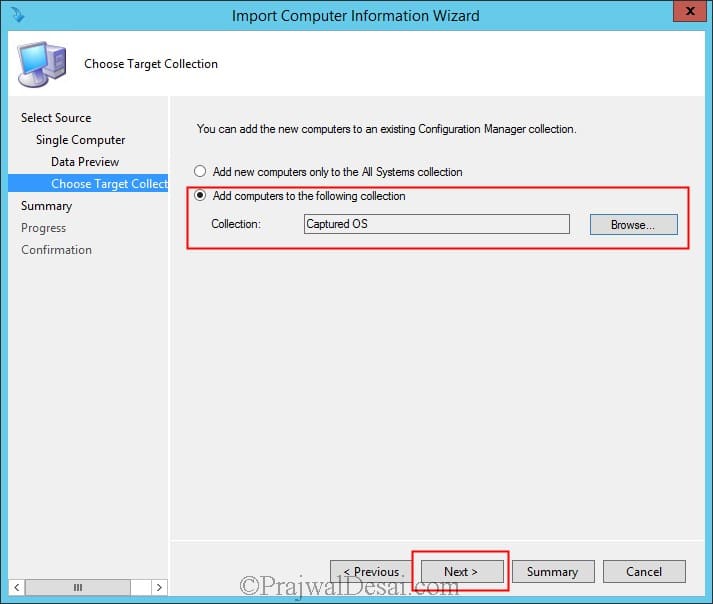
Choose Add computers to the following collection, click on Browse and choose the new device collection that we created. Click Next.
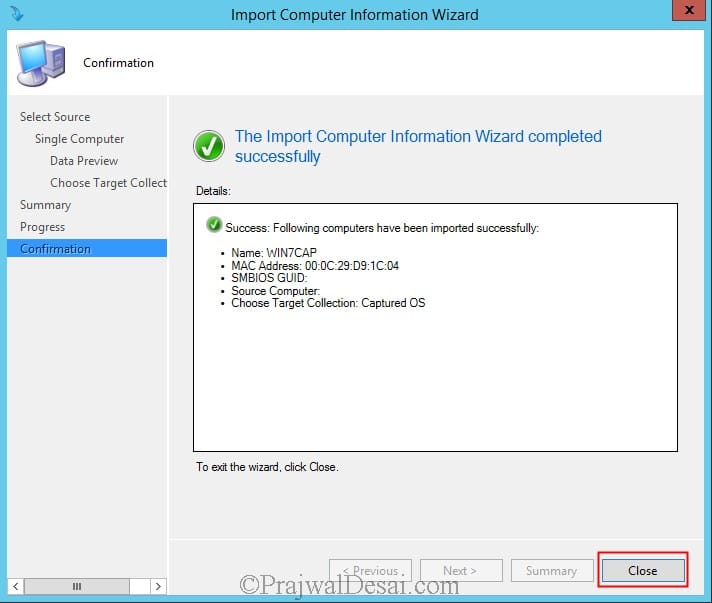
Once the computer information is imported, click on Close. The process of importing this new computer to a new device collection will take few minutes.
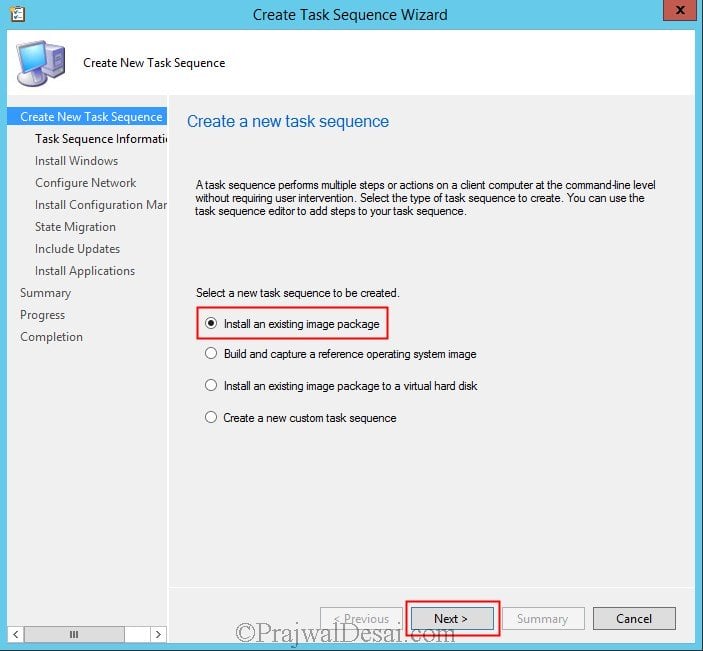
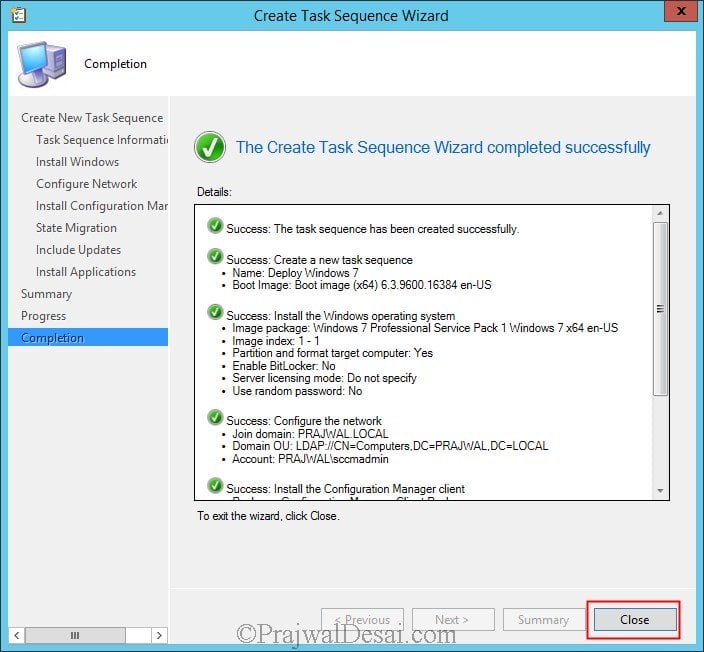
After we create a device collection and import the computer information, the next step is to deploy the captured operating system. Right Task Sequences and click Create Task Sequence. Choose Install an existing image package. Click Next.
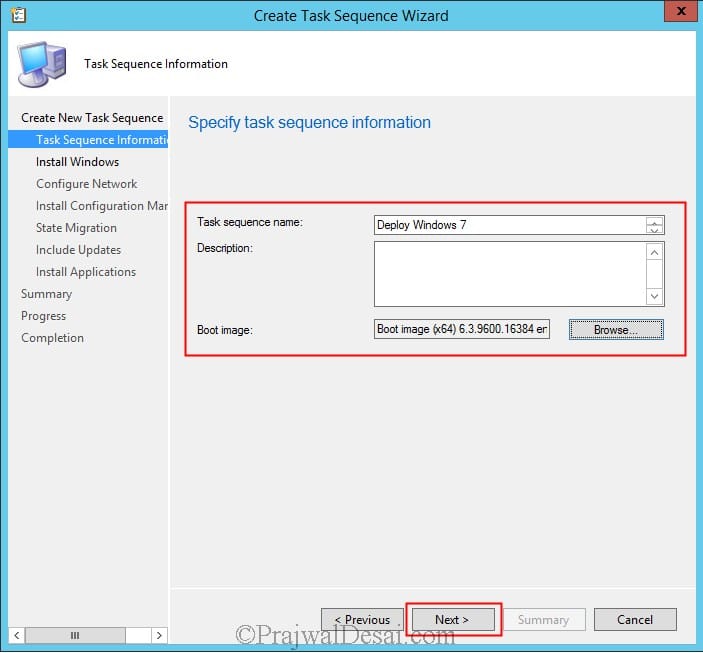
Provide the Task sequence name, click on Browse and specify the Boot Image. Click Next.
Click on Browse and specify the Image Package. Choose Enable the local admin account and set the desired password. Click Next.

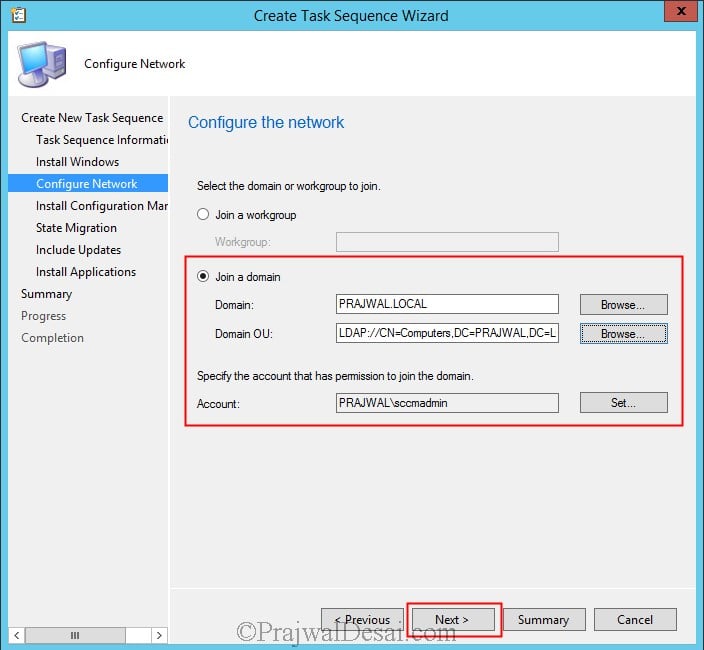
You can choose to add this computer to the domain or join a workgroup. In this example we will choose the computer to Join a domain, click on Browse and select Domain, Domain OU and specify an account that has permissions to join the computer to the domain. In this example we will be using an user account named sccmadmin which is a member of Domain Admins group. Click Next.
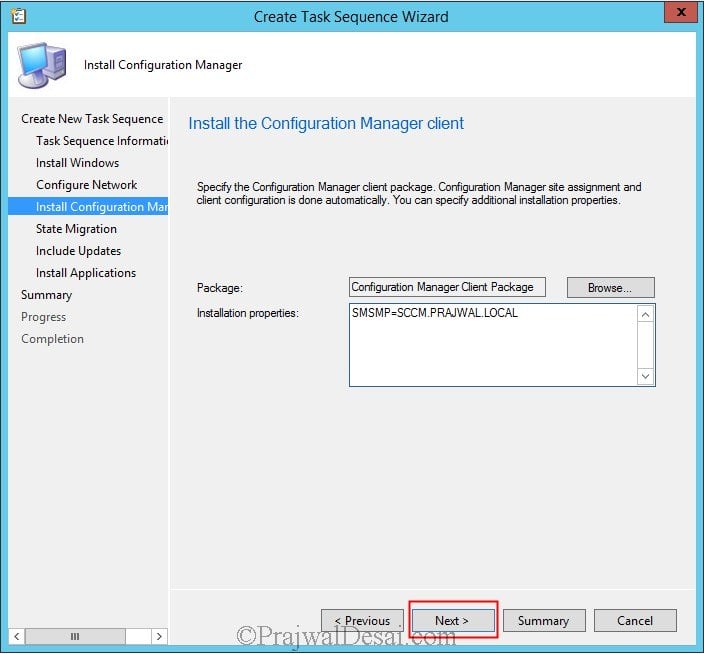
The Configuration manager client package is automatically selected, you can specify additional information in Installation properties such as Management Point, Fallback status point etc. Click on Next.
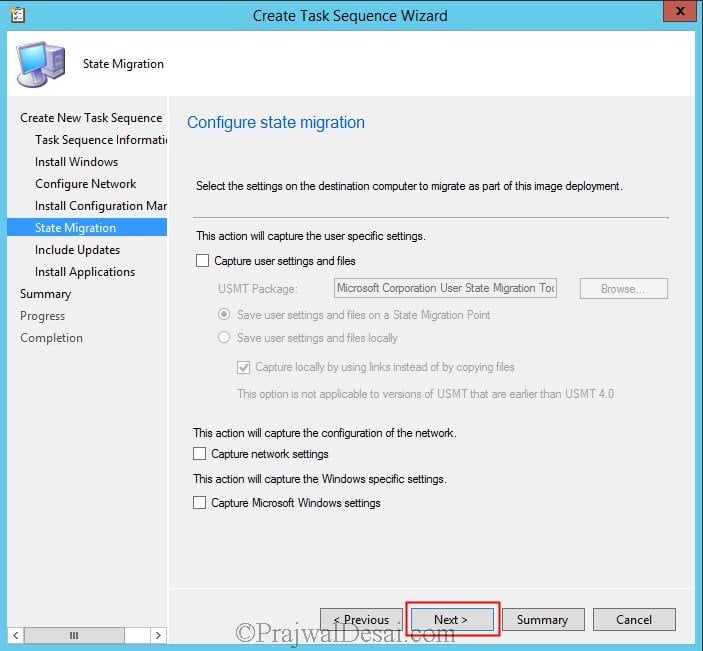
We will not configure Configuration state migration in this post so uncheck all the checkboxes and click on Next.
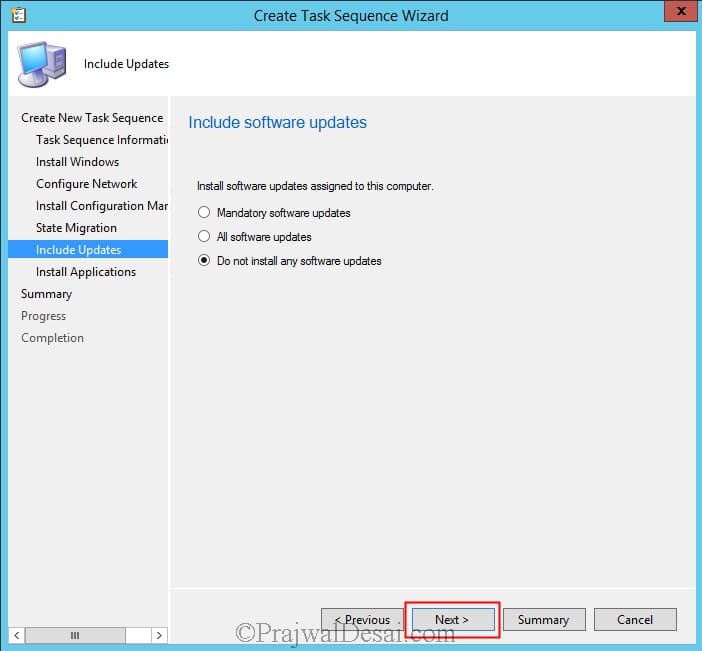
You can choose to include the windows updates which will be installed after the OS deployment. We will see the deployment of software updates in a different post, choose Do not install any software updates. Click Next.
Click Close.
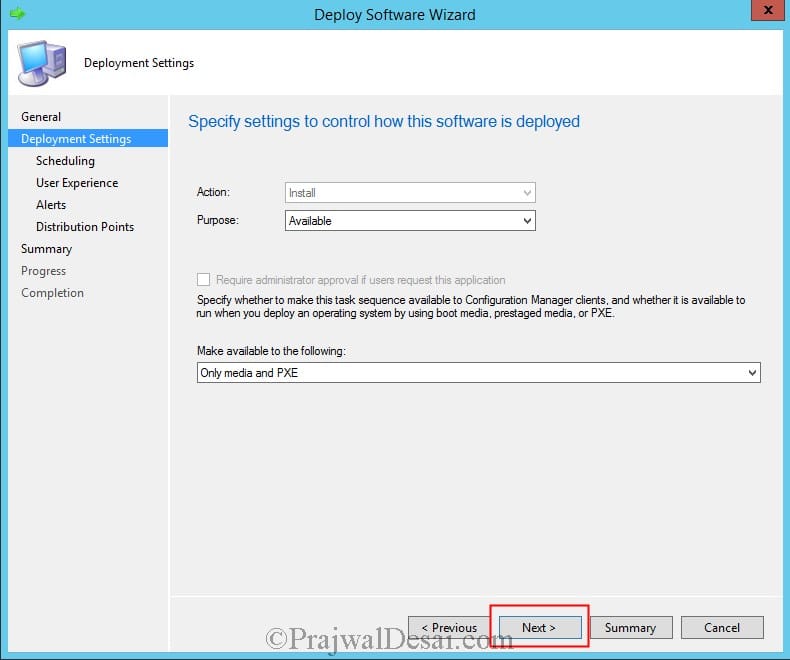
Once the task sequence is created the next step is to deploy it to the device collection. Click on Task Sequences, right click the task sequence that you have created for deploying OS and click on Deploy. In the Deploy Software Wizard, click on Browse and choose the task sequence and Collection. Click Next.

Set the purpose as Available and let this task sequence be available to only media and PXE. Click Next.
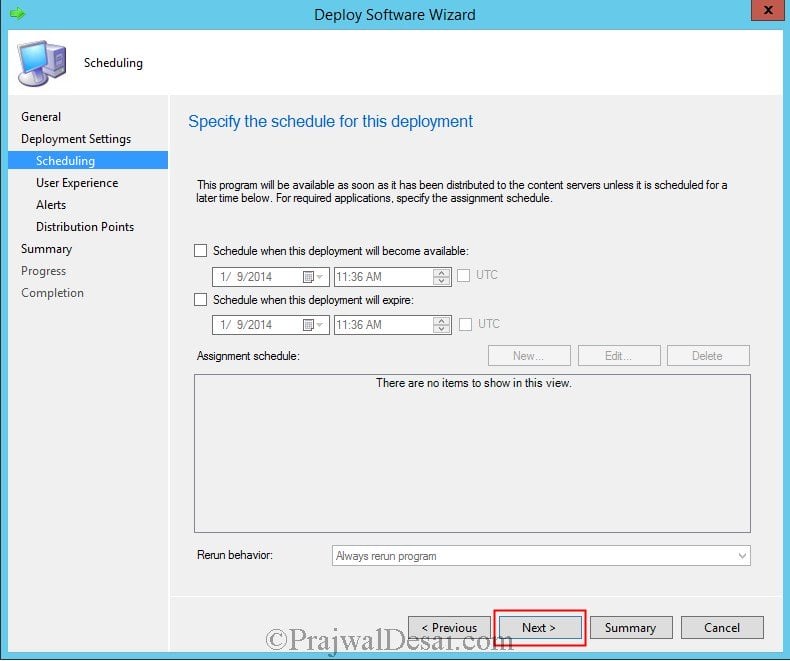
Leave this to default and click Next.
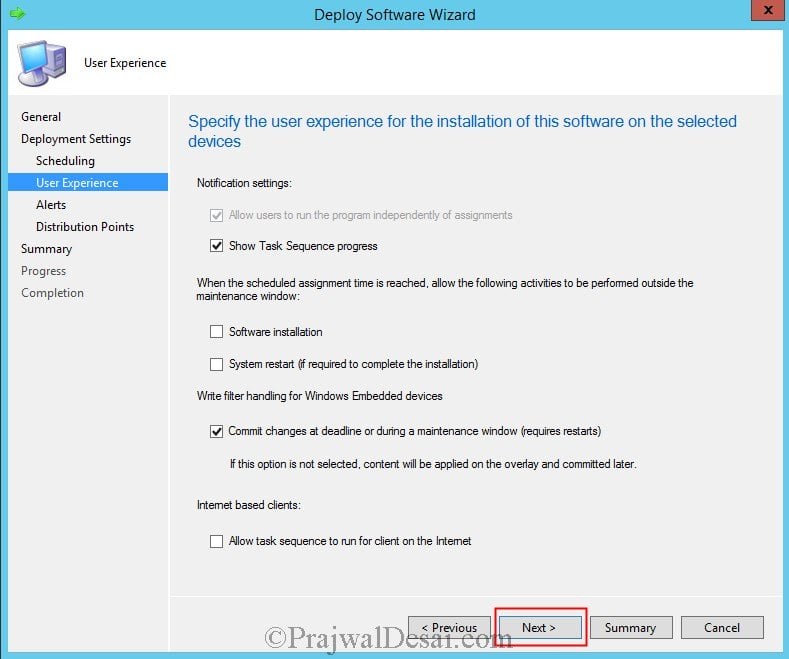
Leave the User Experience options to default and click Next.
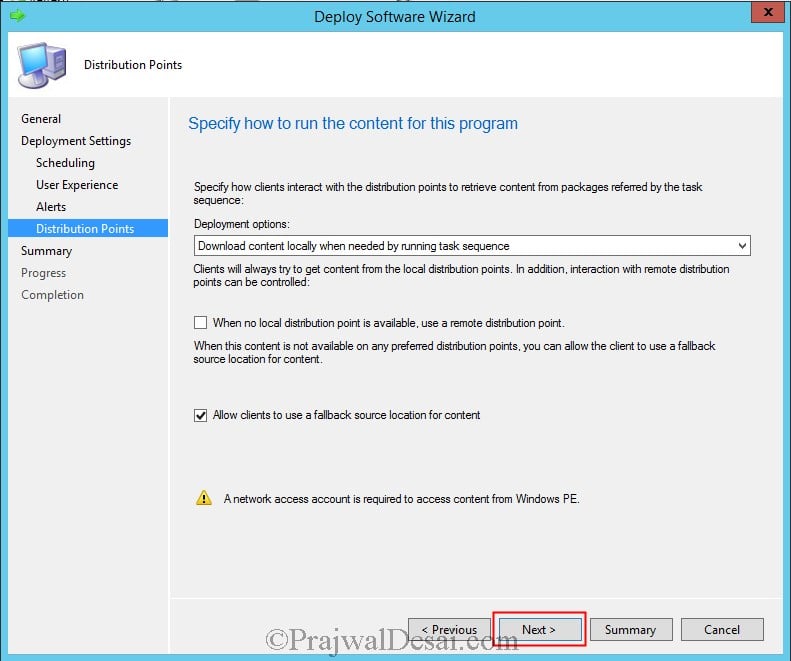
On this screen please read the warning line at the bottom. “A network account is required to access content from Windows PE“. You must define a network access account in order for this deployment to run smoothly. To define a network access account, on the CM2012 R2 console click Administration, under Site Configuration click Sites, in the top ribbon click Configure Site Components, click Software Distribution. Click Network Access Account and add specify the account which has enough permissions to access the network locations.Click Next.
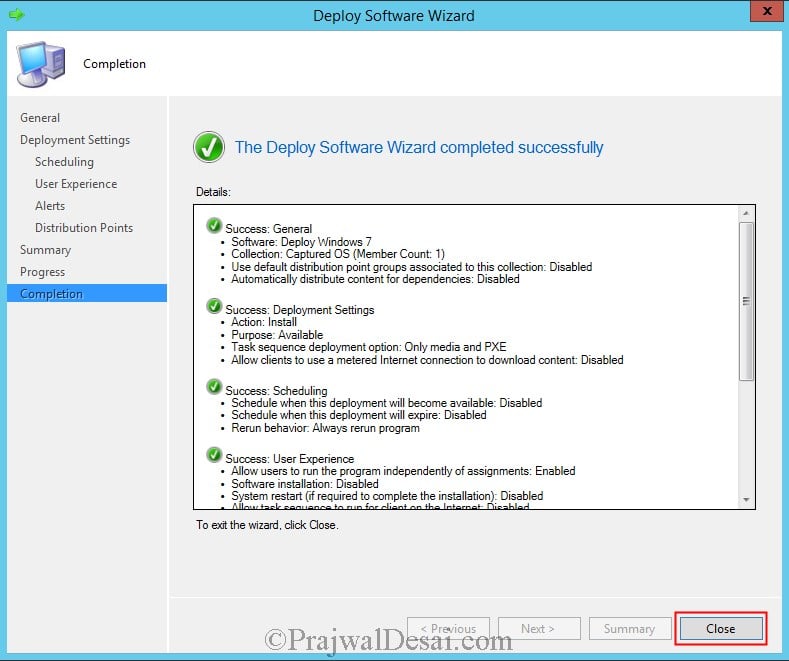
Click Close to close the Deploy software wizard.
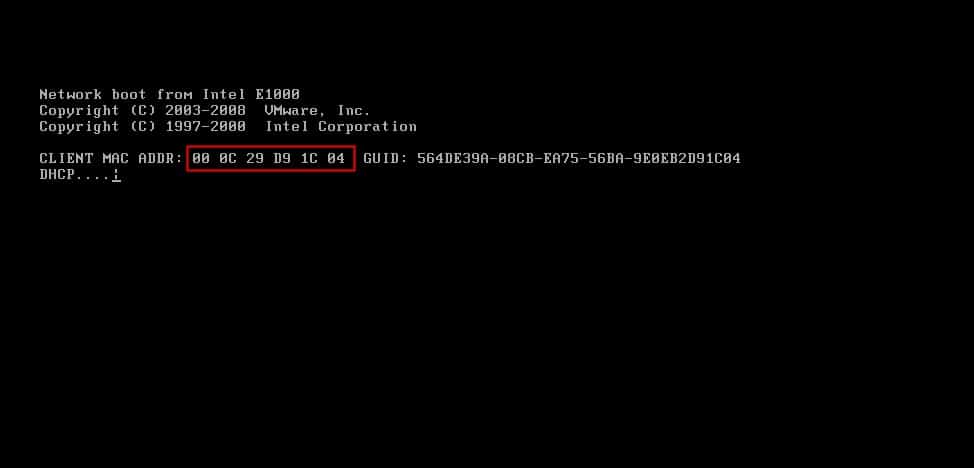
So far in this post we have created a device collection, imported the computer information to the collection, created a task sequence for deploying the captured OS and deployed it to the collection. Now we are ready for deploying the operating system, power on the VM / Physical box where the OS is to be deployed, set the device to boot from the network. On the screen press F12 key for network service boot.
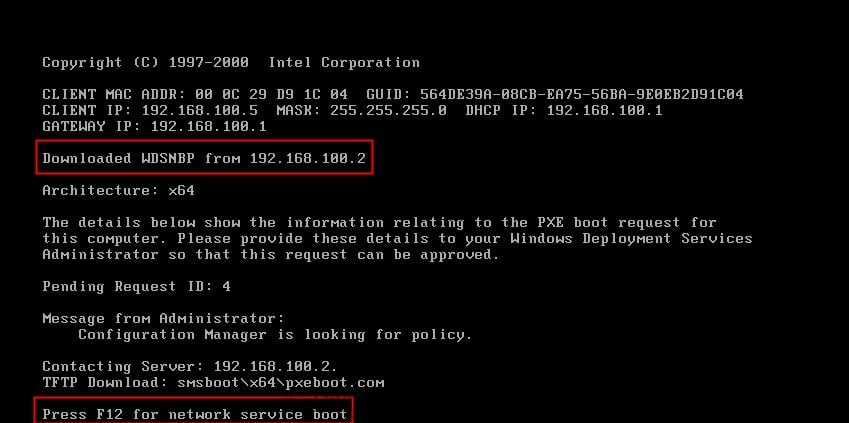
Hit Enter key when you see this screen.
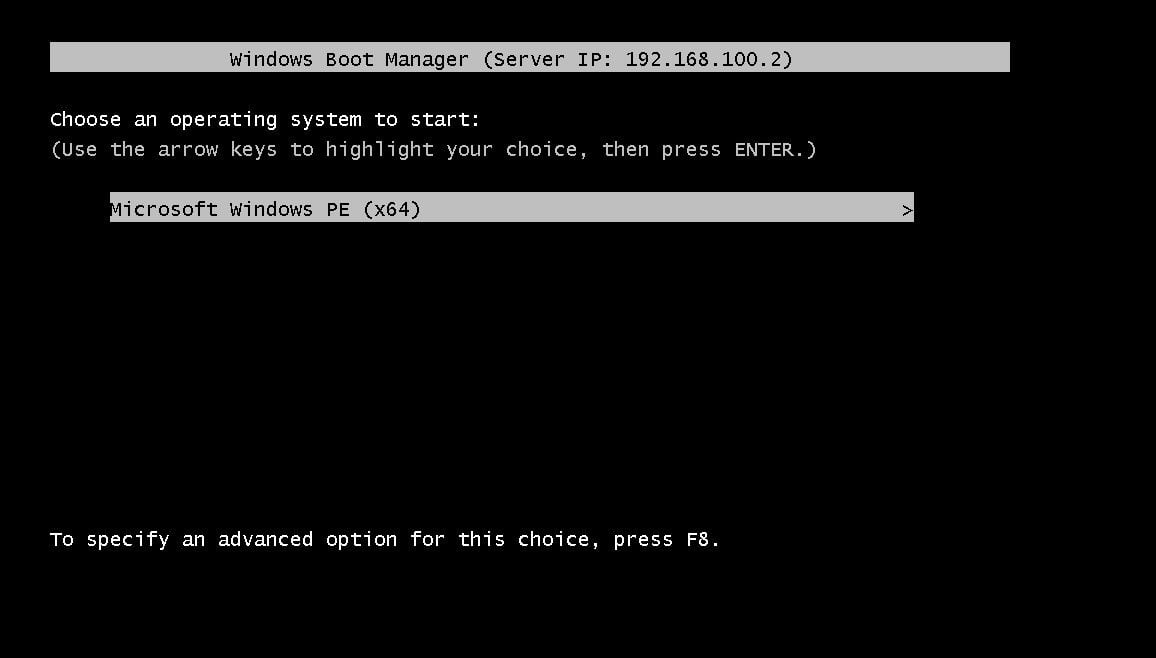
On the Task Sequence Wizard, provide the password and click on Next.

You should see the task sequence for deploying OS under the list of Task Sequences. Choose the task sequence and click Next.

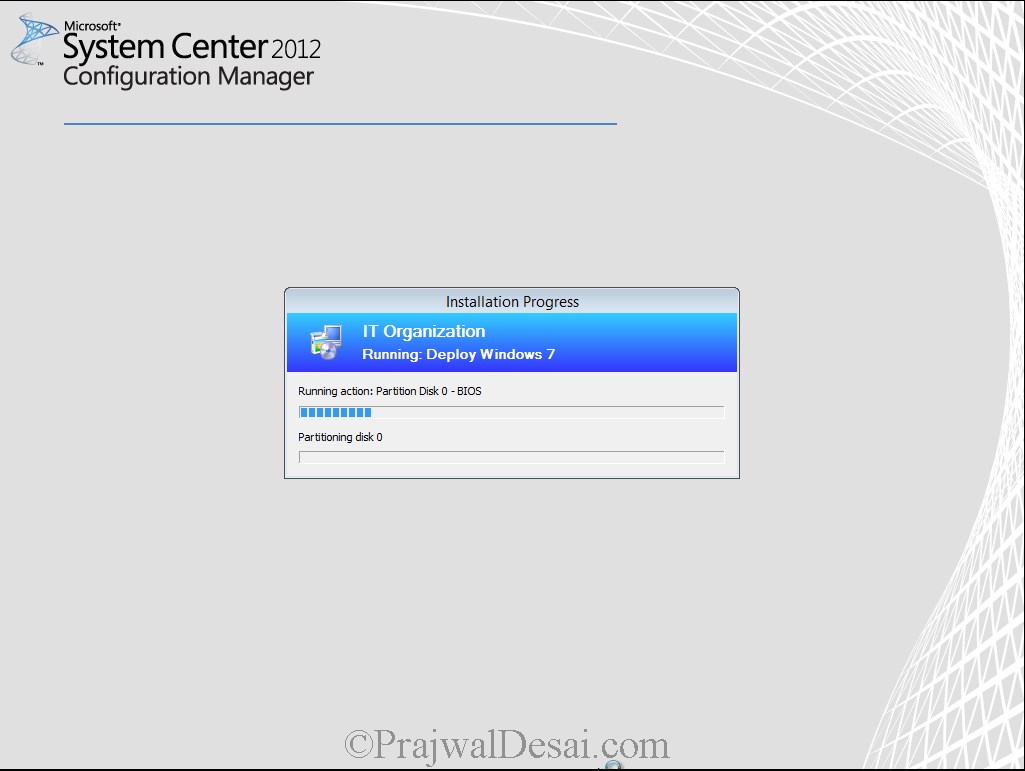
The hard disk is being partitioned.
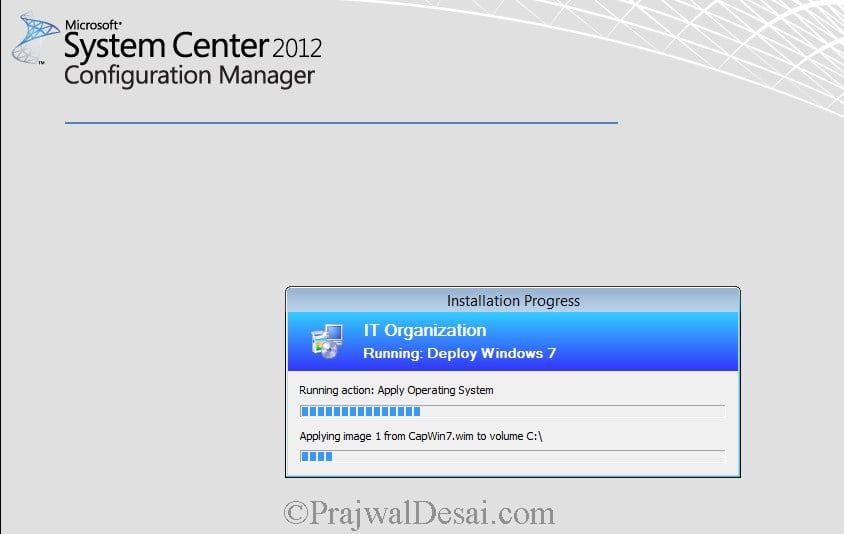
We see that the captured image is being applied to the new computer.
Final screenshot of the windows 7 OS deployment.


Hi Prajwal.
I have a system that has a windows 7. I need to install new windows on this system with SCCM. I want format drive C only that include old windows. what change I should do in your task sequence?
Hi Prajwal,
While trying to image my vm i am getting below msg:
Pending Request ID:9
Message from Administrator:
Configuration Manager is looking for policy.
contacting Server: 192.168.1.100.
PXE Boot Aborted. Booting to next device…
PXE-MOF: Exiting Intel PXE POM.
Operating System not found
Kindly help me to fix this issue.
Hi Navneet, there could be lot of reasons why this is occurring. Please post your question in forums.
HI Prajwal. Thank you so much for your well guided documents. but i have few queries before i start this.
1. We have HQ in Paris and got the rights for SCCM 2016 service to deploy operating system.
2. I am in Bangalore now. need to install OS using SCCM service for other countries like Hong Kong, Japan China, Thailand which are in the same 10.X.X.X.X network is it possible using your document?
3. We have branches in India ( Mumbai and Delhi) with same 10 network, is it possible?
4. We have two countries using SSL gate service in Vietnam and Indonesia. they use SSL certificate to connect to our company applications. I need to deploy operating system but they use their private network. is it possbile to deploy operating system using SCCM?
Please Kindly request you to revert my queries.
Hi Prajwal,
Thanks for you Awesome page you provided to us, It will help us Understand the Clear Installation of SCCM,
1 Question, Shall I follow this same process to Deploy Windows 10 also?
I have similar question, how I can edit task sequence that during OS reinstall I could choose format only C drive and install windows. I don’t want to format D drive
can you please guide me how to install windows 7 without disturbing other partitions,
we sometime need to reinstall OS and if we run the deployment it will wipe all the Hard disk and install freshly,
we just want to install OS on C drive.
Hi Prajwal,
I have an error when i deploy my OS image who’s:
“this task sequence cannot be run because the program files for BUI0000D cannot be located on a distribution point. For more info…, contact your system administrator or helpdesk operator.”
Can you help me to resolv this.
Redistribute package BUI0000D to the distribution point.
Hi Prajwal,
Great write up…
Just wanted to ask if there’s an option for automated image deployment to the machines? If there is, would you be kind enough to share it?
Many thanks.
Hi Prajwal,
Thank you for sharing this step by step procedure.
i have created a Win7 image but i wanna add few software also while installing OS ans also we have different types of laptops and desktops, is it possible to create a master image with basic softwares. if yes pls guide me how to do it.
Please help how do deploy w7 with some softwares.
Hello Prajwal,
Is there any possibility of getting a choice between different operating systems. So, that we can choose among operating systems to be installed on each machine.
Hi Prajwal,
Is it possible to create a task sequence which provides us with a choice among different operating systems during the deployment.
Please post the in community forums.
Good Day
I am a newbie when i comes to deployments via SCCM. I am stuck with an error “PXE-E52: proxyDHCP offers were received. No DHCP offers were received sccm image deployment”
when trying to boot up from the network for image deployment.
The MAC address and Computer name has been specified but the device is not showing in the collection specified after importing the computer information…
Please assist?
Regards
Abdul.
Define DHCP scope on DHCP VM
I too and running into this issue. How did you manage to successfully install applications?
Hello,
I am trying to install Windows 7 on a Panasonic CF 54. The install goes smoothly until the machine has to reboot. Once it reboots at the end it just goes to the black screen giving the options to boot normally etc. I can’t grab the smsts.log files. Its frustrating because it work all the way until it has to reboot. Please let me know if you have seen this. The CF54 is UEFI. Thanks.
You can monitor the TS steps using smsts.log file. Before the reboot happens just make a note of TS step and from next we can find out what’s causing the reboot
The reboot is part of the TS. The problem is when it reboots it doesn’t go to the OS. It fails to find the OS and ask what do want to do “Last know good Configuration” etc black screen with white writing. Could this be a driver issue?
It could be a driver issue but I cannot say it confidently. Why don’t you create a new TS and test it step by step ?.
Hello, I believe it’s the fact we have Windows 8.1 ADK and trying to install Win 10 drivers. I gave up on installing Win 7 on the machine and went to installing Win 10. I noticed when I imported the nic drive into the boot file it’s not naming it correctly. Do you have any documentation on what I need to do once installing Win 10 adk? I’m guessing I have to create new boot images. Thanks
Worked perfectly for me! Thank you for such a detailed documentation. The only issue I’ve been having (and I’m very green with sccm so I apologize) is re-imaging a box that’s previously been imaged. In the properties of my Device Collection under the Membership rules tab, I delete the single workstation and then update the membership. The membership count goes from one to zero. I then re-add the same workstation I just deleted and update Membership again. The count goes to 1. Here’s the issue. When reboot and bring up the deployment wizard I get the message “no task sequences available for this machine. The only solution that’s worked for me has been to delete everything I created and start fresh again. Surly you don’t have to go through all the steps again just to re-image a machine. Any thoughts? Thanks again for the great information!
I just get message, windows i starting and it just sits there. Screen says System Center – Configuration manager, it reboots?
After reboot, I get a message: No operating system was loaded. Press a key to retry the boot sequence… Any idea?
Hi Prajwal,
Very educative and step by step guides. I have question, How should I deal with multiple PXE servers, if I configure IPHelpers on all my routers with all PXE server IP’s and let the client choose which ever response it receives first or shall I load balance them? Any guide for Load balance or High availability.
HI Prajwal,
When I try to deploye task sequence, I get an message: Task Sequence has potential to be high risk deployment. Therefore, the Select Collection” windows display only the custom collections that meet this site configuration for the collection size deployment varification. Deployment varification is configured as part of the sites Properties.
Have you configued the boundaries correctly ?. Have you associated DP to the boundary group ?.
Hi Prajwal – Thank you for your time to reply. Yes I have configured the boundaries exactly as you advised in your previous notes to configure Bountires for configuration Manager 2012 R2. I have been following all your lectures for Configuration Manager 2012 R2.
https://uploads.disquscdn.com/images/bd5bc7f605b839912afbd47c28207b95a766886cc20d3a28aba8f376a5226547.png Hi Prajwal – Yes I have configured it boundaries as you advised in your previous Posts for Configuring boundaries for 2012 R2. and Yes DP is associated with Boundary group.
Hi Prajwal,
I am getting an error when I try to deploy it that “Operating system not found” even I press F12 nothing happens and shows ” Operation system not found”
To what collection have you deployed the TS ?.
Initally I deployed it to all Unknown computers and it was showing the same error that no operation system found. Then I created another collection for my newly created VM and imported that VM info to that Collection as you advised in the post but it still failing
Please see attached the error and Logs.
Thank you
Sincerely
Harmeet
Hello Prajwal,
Great blog and very detailed, I am learning a lot from your blogs, great help and appreciate it. I am doing in place upgrade, where I am deploying windows 7 to the existing windows workstation, it works but after the new windows is installed and settled the deployment job starts again on the same machine, please help me with this.
(I am chosing Required in the deployment configuration)
AMK
AMK
OS is successfully deployed, but the system didnt join domain automatically while we mentioned in the task sequence, the domain name and password.??
Any idea ?
did you check the smsts.log file ?.
Hi Prajwal,
Thanks for your support.
During Part 15 : “Deploying Windows 7 Using SCCM 2012 R2” I have faced 3 issues, one was 0x80070490, which i solved by selecting 2-2 in the Operating System deployment method. Second issue was 0x80070002 which was solved by “Enabling Autonomous System” adn then again i faced 0x80070002 which was solved by “Manage Access Account”.
All these issues were on the initial stages.
But now after downloading OS, installing Image 1 and then Installing Image 2, then drivers; almost everything done.
The process is almost in the end but again i got 3rd time this message 0x80070002 during “Setup WIndows and COnfiguration Manager”,
I am attaching the snapshot
Any Idea to solve??
Hi Prajwal,
I would literally appreciate your efforts regarding this training studies. I am following SCCM all the 52 topics step by step. I have been successfull so far, but now in this topic I have followed all the steps.
A separate physical desktop System has DC, SQL and SCCM, while i have created 2 VMs for PXE boot.
My question is, there is always a need for DHCP in WDS deployment method, but here in this procedure i didnt see any thing regarding DHCP. Because when i booted the VMs with PXE they prompt for IP which they cant get, SCCM Server has to provide DHCP to the VMs.
My VMs are Bridged with Wireless network but they work when they have operating system, now in DOS mode how can they have IP while PXE boot.
??
I am stuck in this step. kindly reply…
DHCP server is required to assign IP address to client machines during the PXE boot. You mentioned that ” but here in this procedure i didnt see any thing regarding DHCP.” Which procedure are you talking about ?.
Hello Prajwal,
What is the best way to update an image? I found something about the use of DISM. what is it and are there any other options. By updating image, I don’t mean updating the software that’s on it, but like provide new apps or something.
Hi Prajwal,
Starting the PXE-boot worked, once I got in the Configuration Manager Task sequence wizard it asked for a password, that worked aswell, but than a few moments later when it was at the part: apply operating system it gave the following error:
hey Prajwal
I have followed the guide above, and trying to deploy image to a HP elitebook 850G3, but everytime i boot it in PXE, it looks like this(see uploaded image) and it stucks there for a while, no tasksequence what so ever, after few min, it restart automaticly. What is wrong with this? help plz
Hi Prajwal,
I could successfully deploy Windows 7 OS and relevant driver pack in my machines, but can’t succeed in installing applications during the OSD task sequence. I have added Install application step in the task sequence and selected the application packages, but for some reason it is not getting installed during the OSD. Do you know of any solution?
Thanks.
Hello Prajwal. I have followed this to the letter and have successfully captured Win 8 and 10 and deployed both via PXE so thank you.Here is my question however. So i have anew machine, virtual or physical. I want to add the machine for image deployment. Would i need to go through the entire process of creating a new device collection just to add the one new computer? I have imported my single computer using MAC address but I am not sure where i need to add it in order for it to get an image from PXE. When it boots now it downloads WDSNBP from my SCCM server IP address and goes onto say “Message from administrator: Configuration manager is looking for policy. It says contacting TFTP download followed by operating system not found. How do i associate the new computer with an existing job? Could you point out at what stage this new machine is included? Thank you.
Hi Prajwal,
Firstly, great posts!
I’ve got an issue when trying to deploy Win8.1. I can PXE and start the deployment, but my blank VM (VMware 5.5u2) stalls when partitioning the disks. I get a 0x8004242c error (VDS_E_VOLUME_TOO_SMALL). My captured WIM is around 10GB and my target device disk is set to 20GB so more than enough space.
I have also removed the CD/DVD drive to remove any issues with writing to the wrong drive.
Any ideas?
Thanks,
Alex
No worries, all sorted. Simply extended my VHD to 32GB and it worked 😐
So after you extended VHD to 32GB, did that fix the issue ?. Your question and answer are in the same comment 🙂
Yes, that fixed the issue.
Is there a minimum disk size requirement that needs to be met, and if so, where is that variable configured?
Thanks
Followed the well written articles, but I am having issues when it asks for the media password?
I saw someone else posted about this, which password is it we’re entering here?
On my test physical machine it was installing the OS but did not join the domain or install the SCCM client. After checking I saw that the network driver was not installing correctly so I fixed that and it is now installing the client but it still does not join the domain. I changed the Domain OU from the default “Computers” to another OU and tested it on a VM which did join the domain and install the client. Now when I try again on my physical machine it I get “No Task Sequences available”.
Nice and well written article..
hi
is there any way to deploy windows to 500 computers without configuring PXE? all the computers have Win XP right now.
You can use either a Bootable USB Stick or CD to boot a bare-metal computer and install the OS through Configuration Manager, PXE is not required.
actually i want to do this by network so there shouldn’t be any system touch (Zero Touch Installation). can i use Task Sequences and prepare the system for windows installation by uploading Windows Image and Forcing to boot from that on next bootup ?
we have SCCM Agent installed on all systems right now.
Yes, you can create “Task Sequence Media” to capture and deploy Windows images. Just right-click on Task Sequences for that.
Hi Prajwal,
Drivers section not recovered in this post, any link for the same please ??.
Agreed. I have created a separate post on adding drivers to SCCM boot image (ex Vmware drivers) – https://www.prajwaldesai.com/import-vmware-drivers-to-your-sccm-boot-image/
I’m aware this post was made well over a year ago, but I hope someone still monitors it for discussion. I followed all of these steps and it all looked good. I booted the client machine into PXE and was prompted with the Task Sequence Wizard, but my newly created task sequence was not listed. One of my others was, however. Does anyone have a suggestion as to my error?
Looks like this is an issue related to NIC drivers. What does smsts.log file says ? – https://www.prajwaldesai.com/location-of-smsts-log-during-sccm-osd/
This is what Logs look like. I am captured a new ISO from a Toshiba laptop and trying to deply it to a new machine using task sequence via WINPE
Hi Prajwal I am having issues when I start the laptop and after going to WINPE environment laptop simply restarts (where it says network connections). I am following your blog to install it exactly the same way and have also installed the drivers in in the boot sequence but still it fails. Any ideas ?
hi i have followed the info above but there seems to be a problem. after the OS deploys it gets all the way to install configuration manager client and it install but after that step the system errors and says that the install failed with the error code (0x80004005) which is the same as failed to retrieve policy for this computer. I have attached a picture of the error. can someone please tell me why this is happing.
Hi I have followed your info above but there seems to be a problem with me. After the os deploys it go to the final screen where it is installing the client manager and after install of it finishes boom error the install failed will add pic so you can see. Can someone tell me why this is napping?
Could you check the log file and see what’s exactly causing the computer to reboot ?
https://www.prajwaldesai.com/location-of-smsts-log-during-sccm-osd/
i have fixed that problem it was trying to enable bit locker which is only available on ultimate and higher. but now i have a new problem it is giving me a error after i enter the password and says that could not grab policy for this computer with error code (0x80004005). Could it be that my router is handing out ip’s while my server is trying to and i will post logs.
hi i followed all of the info above but after it got to installing configuration manager it failed but the OS installed fine could someone tell me please how to fix this thank you.
Let me know if this issue is occurring for more than one computer.
yes almost every computer. there is a time when it works but it is only for that you computer and when i try it on a different computer if fails with the same error code. why do you think it is failing?
I see the error “”
GetTsRegValue() is unsuccessful. 0x80070002.
Can you confirm if you have configured the network access account ?
What is that
Please check this – https://www.prajwaldesai.com/task-sequence-failed-error-code-0x80070002/
Did that and it still did not work.
I went into my router and disabled the dhcp in it and after that it started working like a charme. Not really any problems other than one computer wants to give a (0x80070570) but I have got it all worked out. Ran a disk check and fixed it now happyly deploying windows using SCCM.
Hi Prajwal,
I have created the task sequence and I can deploy the OS successfully without any problem but the applications added to that task sequence is not installed after deployed OS and I couldn’t see any errors.
I have added (Google Chrome, Skype, vlc player, winzip) in task sequence they all are .msi file.
I have been reading lots of forms but couldn’t find any thing apart form to put Pause. I didn’t try that pause work around yet as couldn’t understand where to put Pause or is there any easy with to do that.
I have install hotfix KB3007095 but still didn’t work :(.
would you be please so kind to replay ASAP as I have to deploy and finish this task on production after testing. sorry to be impatient.
Thanks a lot. i will check..
Hi Guys,
Im successfully deploying my image to the target computers.
I now would like to know if there’s a way i can add network drivers to my image because at the moment i can only install it to some computers (from which i captured the image). how do i add drivers for other models?
Mr.prajwal this was an useful documentation i have been following the entire post of install sccm step by step guide.i was able to create task,but once i press F12 it takes the image and reaches the sccm screen where it shows preparing network connections and restarts.please i would like to know your opinion about what i have done wrong.
@Muneer – Have you added the network drivers to the TS and distributed / updated the boot images to the DP ?
Sorry, you need to post the complete log file.
i can’t seemed to post the whole log on here. do you have an email i can send it to?
thanks.
thanks. The other issue is getting the SMSTS.log file. i’ve enable the “command line options” in the boot.image x64 BUT when the encountered the error, pressing F8 doesn’t do anything for me. i’ve tried numerous time and even have 2 different images to test and both ran into the same error with similar results. F8 doesn’t work on both.
what other options are there to get the log from client?
thanks!
Did you re-distribute your boot images to their Distribution Points after enabling the command line options ??
found a way to get the log off the client but can’t pint point the exact issue. can you help?
this is the latest on the log at near the bottom of it.
thank you!
———————————————–
![LOG[Failed to run the last action: Apply Operating System. Execution of task sequence failed.
Element not found. (Error: 80070490; Source: Windows)]LOG]!>
open(), HRESULT=80070002 (e:nts_sccm_releasesmsframeworktscoreenvironmentlib.cpp,335)]LOG]!>
open(), HRESULT=80070002 (e:nts_sccm_releasesmsframeworktscoreenvironmentlib.cpp,553)]LOG]!>
yes i did. also sent you a log if you can help me out.
weird… i posted a few mins ago and seemd like it was removed?
@LHN – The comment was not removed. I moderate the comments to avoid the SPAM.
thanks for the step by step. i has been very helpful thus far BUT I ran into task error 0x80004005 after on the “apply OS” on task list.
the sequence of my task lists are:
restart in winPE
Partition disk 0 – bios
apply data image (1-1)
apply OS (2-2)
apply windows settings
apply network settings
apply device drivers
Setup windows and conf
any suggestions is appreciated.
The task sequence looks fine. You must check the SMSTS.log file in such situations.
https://www.prajwaldesai.com/location-of-smsts-log-during-sccm-osd/
Prajwal do you have complete documentation (video, pdf, . . . ) for zero-touch os deployment using SCCM 2012 R2 & MDT 2013?
No Bojan I don’t have that yet.
hi,
1. In the window whr u chose “enable the account and specify the local admin pwd” . wht is this option ? its talkin abt which accnt and which pswd ?
2. when the os is getting deployed, u provide a pswd. which is this pwd ? is this d one which we gave when we configured the DP ? lots and lots of acc and pswds. nw access account , sccm admin accnt , pxe pwd , its too confusing !!!!
3. how this method is used for large scale deployment ? we cant go to every pc and enter F12 key !!!!!
4. how this method is diff from the previous “build and capture” method ?
5. we installed wadk as pre-req. wds is also a pre-req as given in other sites. I guess the boot images we see in ConfigMgr is bec of wadk. i wanted to kno exactly where wds wadk r gettin used ? everythin we did in configmgr console then whr r wds and wadk gettin useful !!!!!
6. u r accessing the .iso from nw share tht means reference pc is in same nw wid the server pc eventho its not in domain !!! so cant i capture the OS of a pc which is just standalone pc in no network ?
7. u added the dest pc to collection using its mac address. is tht pc in a nw wid the server pc?
thx
@Sion – have you set DHCP class identifier option #60 in the DHCP configuration ??
No i do not have a DHCP server setup or configured in my lab environment.
while on this: i tried changing the settings for the VM – on the client i changed the “Custom: specific virtual network from VMnet1 (Host-only)” and back and now im getting the PXE-E53: No boot filename received”
do i need to install DHCP on my server?
i.e on my DC
Thanks for the reply
Yes you must install DHPC server.. If you are using VMnet 1 (host only) i guess the IP address is assigned by the virtual DHCP server.
Install DHCP server on your active directory VM or any other VM and go to C:Program Files (x86)VMwareVMware Workstation and launch vmnetcfg. Select VMnet1 and uncheck the box ” Use local DHCP service to distribute IP address to VM’s”
Ok cool thanks. my vm is now getting an IP from the dhcp server and i’ve configure the options for the dchp. im now getting the following message. “Operating system not found”.
TFTP Download: smsbootx64abortpxe.com
while the logs on the sccm says: no boot action.Aborted. Not Serviced. and no advertisements found
Check if WDS service is running ? Have you applied CM2012 R2 hotfixes ?
restart the WDS service once and try…
https://www.prajwaldesai.com/configuration-manager-2012-r2-hotfixes/
yes the hotfixes are installed. i followed all your docs. i have now restarted the wds service and thanks that part is fine now.
im now successfully picking up the image, like im connecting to the boot manager and selecting the operating system after that it will start loading files… then Initializing Windows PE and then it restarts. so its now just restarting. it does not get to the point where i have to enter the password.
Thanks
Redistribute the boot images to DP once again..
got this eroor how can solove it? task sequence has failed with the error code 0x8004242c
Prajwal,
I followed the steps and im using VM Version 10.
however, when booting my vm from the network i get the following error
“PXE-E55: ProxyDHCP service did not reply to request on port 4011.
PXE-M0F: Exiting Interl PXE ROM
Operating System not found”
please assist.
Thanks
SION
Prajwal,
Thanks again for this great resource. I’ve followed this guide, and the preceding guide to a T, however when attempting to deploy the image I get an error. Once I’ve booted into WinPE on the test machine, and chosen the correct task sequence, I get an immediate error that reads
‘Failed to Run Task Sequence’
‘This task sequence cannot be run because the program files for (Boot Image ID) cannot be located on a distribution point. For more infomation, etc.’
Could you point me into the direction to fix this?
Have you configured the Network Access Account ?
Is there an automatic install OS to Workstation without hit the F12 key. Thanks.
No, it is recommended that you use F12 key during OSD.
Does not work : error downloading strategy for the computer… (0x8004005)
its a lenovo t540p
you have to press function + f12
and it works fine
I have an issue i get the the F12 but then i get error message pxe-m0f exiting intel boot agent
where should i start to trouble shoot
you have not specified the PXE error code in the comment.
Prajwal
I still receive the same error, googlie thousand times and there are a thousand different solutions but none applied. I can not find the solution.
Hello
I’m using as a virtual platform, vmware fusion 6 on a macbook pro. The problem I am having is that this notice when booting via network from an empty VM, appears
“Downloaded WDSNBP
Architecture: x64
The details below show the information Relating to the PXE boot request for this computer. Please provide these details to your Windows Deployment Services Administrator so That this Request can be approved.
Pending Request ID: 45
Contacting Server: IP Number
TFTP Download: smsboot \ x64 \ abortpxe.com
PXE Boot aborted. Booting to next device … ”
Not if it is an error vmware fusion, virtual network adapter or some settings in SCCM.
The SCCM server is 2012 R2.
Excellent post.
thanks
can you check this post https://www.prajwaldesai.com/boot-images-distribution-point-configuration-osd-sccm-2012-r2/ for the DP settings and verify if you are using the same settings.
Hi,
This is nice tutorial. Is this work in SCCM 2012 SP1?
I need to perform OSD from SCCM 2012 SP1 environment.
Yes it works for SCCM 2012 SP1 too.
Hi Prajwal,
Recently I upgraded the SCCM to 2012 R2 versionfrom SP1. I noticed that my application deployment task sequence during the OSD failed without any error message.
Basically after the Configuration Client Manager installation (your last step of installation) the windows machine screen just showed the logon screen. No more Apps download attemps.
Eventhough I have set the network access account on the Site Component the warning about “Network Access account” is still showed up during the Task Sequence creation. Is this normal?
All the OS and apps deployment were working fine on SP1.
Do you have any clue?
Thanks in advance.
Hadi
Check smsts.log and Appdiscover.log files.
Good one. Thanks a Million for posting all Basic requirments ,i am just reading all your post when i get free time form My job .
Regards,
Arshad