


How To Deploy Microsoft Office 2013 Using SCCM 2012 R2 In this post we will see how to deploy Microsoft Office 2013 using SCCM 2012 R2. If you are planning to deploy Microsoft Office 2010 using SCCM 2012 then you can click on this link. In this post we will be deploying Microsoft Office Professional Plus 2013 64 bit edition and the copy of office that I have is an MSDN copy. We know that the OCT (Office Customization Tool) is available only with volume licensed versions of Windows Installer-based Office 2013, Office 2010, and the 2007 Office system. To determine whether an Office 2013 installation is a volume licensed version, check the Office 2013 installation disk to see whether it contains a folder named Admin. If the Admin folder exists, the disk is a volume license edition. If the Admin folder does not exist, the disk is a retail edition. As there is no admin folder with MSDN copy we will first download Office Customization Tool 2013 from here. We are basically looking for an unattended setup of Microsoft Office 2013 and this can be achieved only when you customize the installation using office customization tool. You can refer to SCCM 2012 R2 step by step guide here.
How To Deploy Microsoft Office 2013 Using SCCM 2012 R2
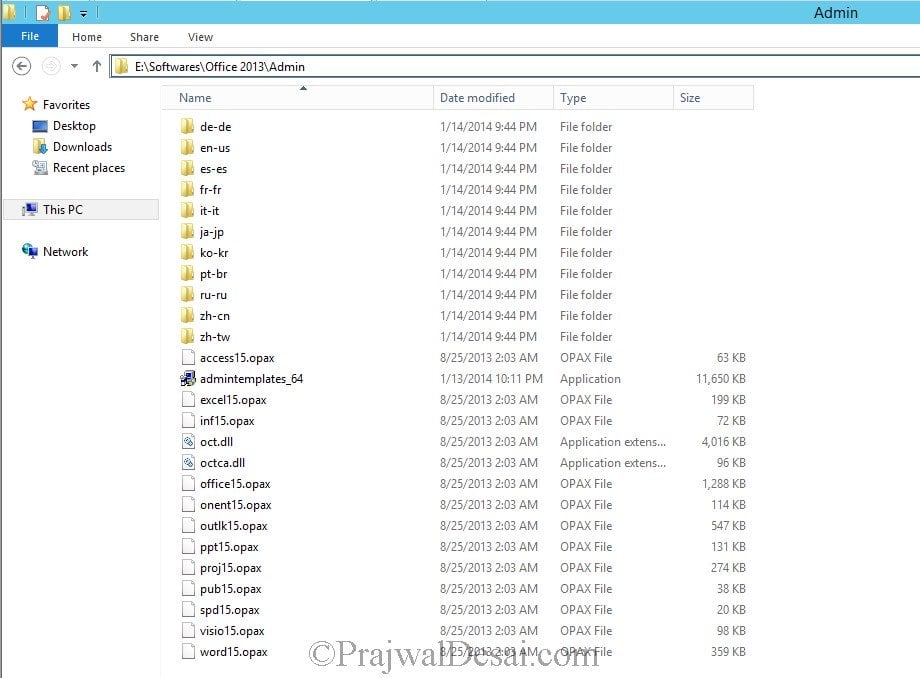
Once you download the OCT 2013 setup file you need to install the software. Run the OCT 2013 executable file and extract the files to a folder inside Office installation files. In the below screenshot I have manually created the Admin folder and copied the OCT 2013 setup file inside it. The files are extracted to Admin folder, you can also skip creating a folder manually because the OCT 2013 setup file creates a folder named Admin by itself and extracts the files in it. The office 2013 setup files are stored on a drive in SCCM server in a folder named Office 2013.

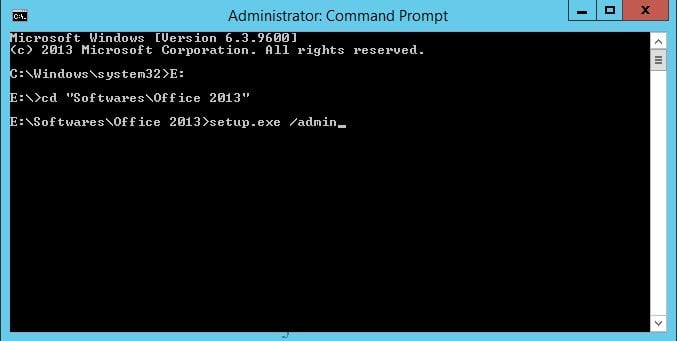
On the SCCM server run the command prompt as administrator, change the path where office 2013 setup files are located. Run the command setup.exe /admin.
You will now see Microsoft Office Customization Tool, Choose Create a new setup customization file for following product, verify that correct product is selected. Click on OK.

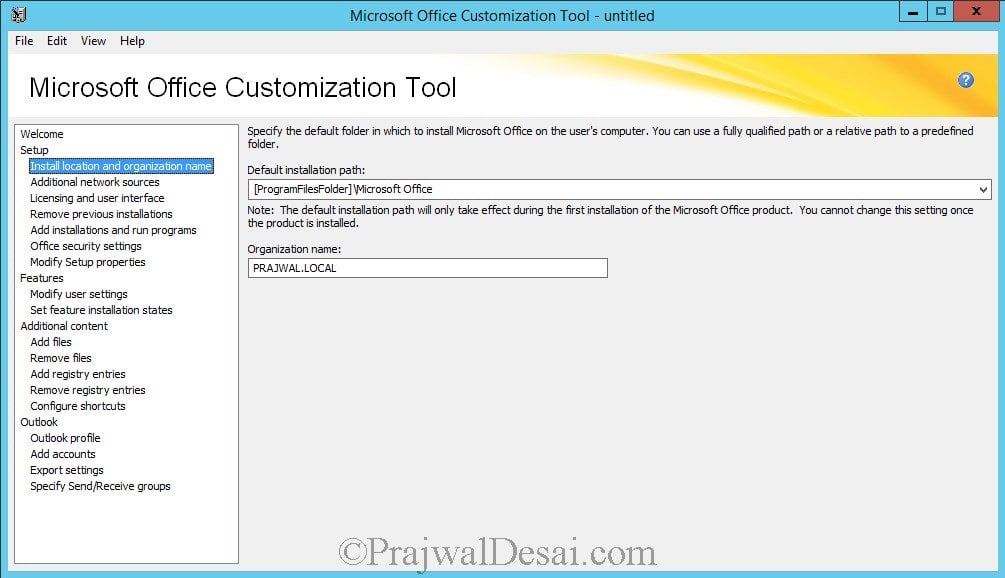
Select Install location and organization name, in the text box provide the Organization Name.
Click on Licensing and user interface, choose the option Use KMS client key if you have KMS server in your organization for activating office 2013 suite, else choose Enter another product key and enter the office 2013 key. Click on I accept the terms in the license agreement. Select the Display level as Basic, check the box for Suppress modal and No cancel.

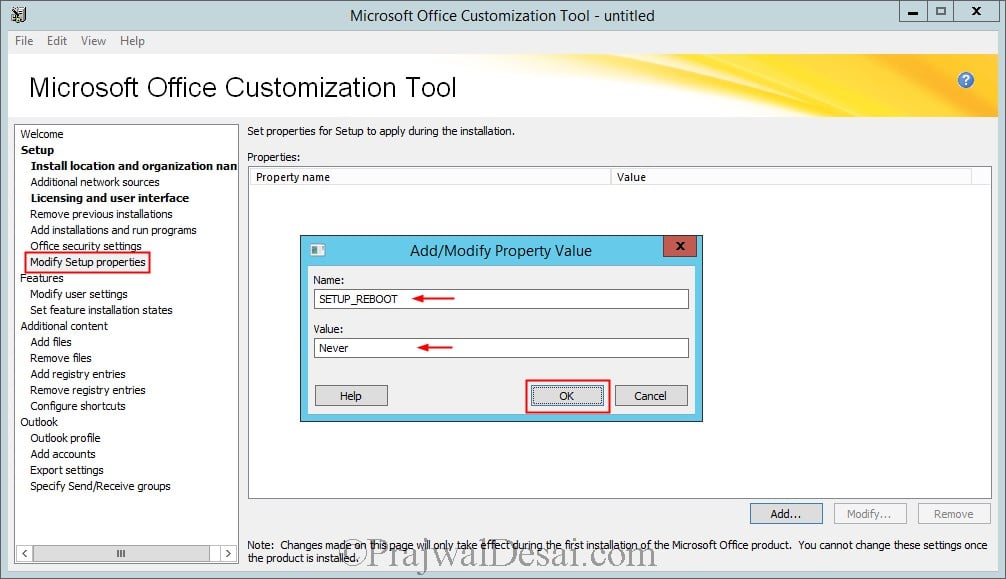
Now click on Modify Setup properties. Click Add, provide the Name as SETUP_REBOOT and Value as Never. Click OK.
Select Modify user settings, Microsoft Office 2013, Privacy, Trust Center. Double click the setting Disable Opt-in Wizard on first run and set the status as Enabled.

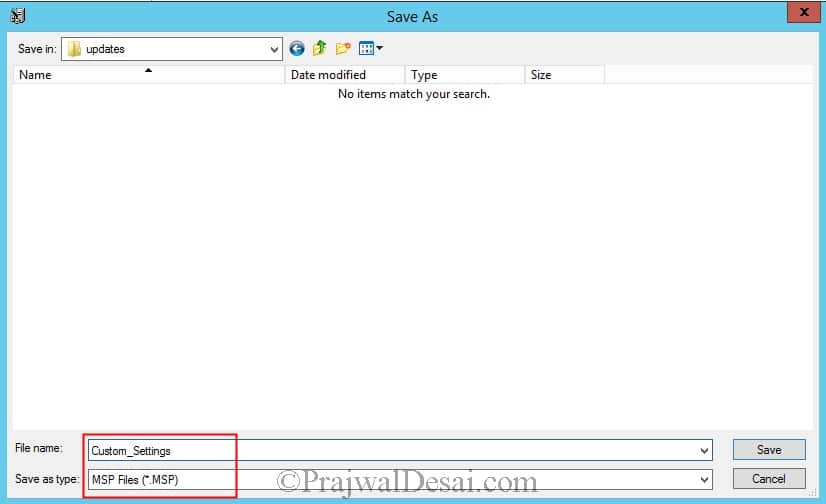
Now click on File -> Save As -> save the customization file inside Updates folder. Close the OCT tool.
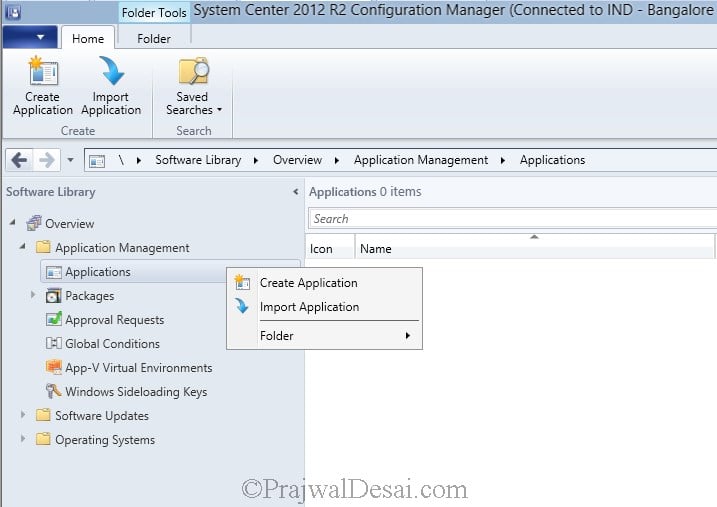
Open the SCCM 2012 R2 console, under the Application Management, right click Applications and click Create Application.
Choose Automatically detect information and provide the path to file proplusrww.msi. Click Next.

The application information has been imported from .msi file. Click Next.

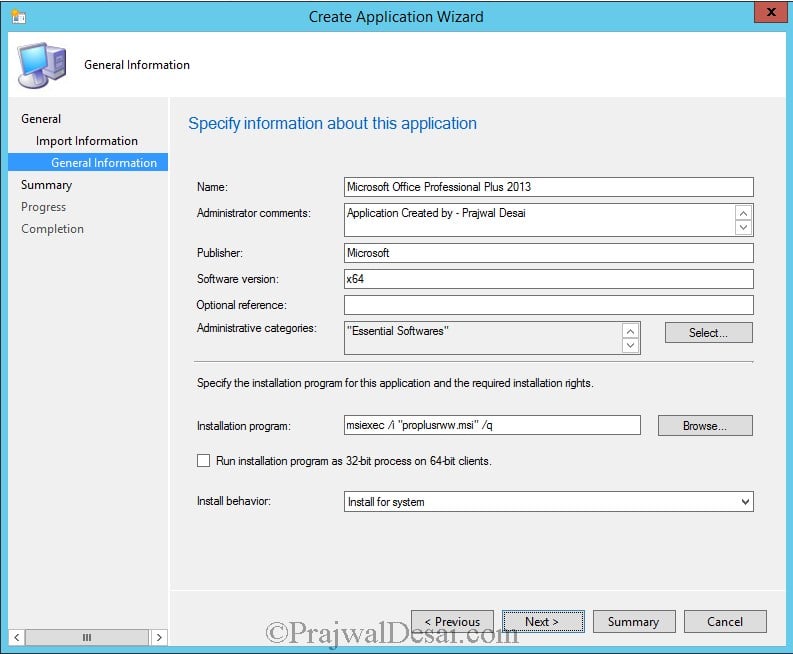
You can specify a little information about this application. We will change the Installation program command later. Choose the Install behavior as Install for system. Click Next.
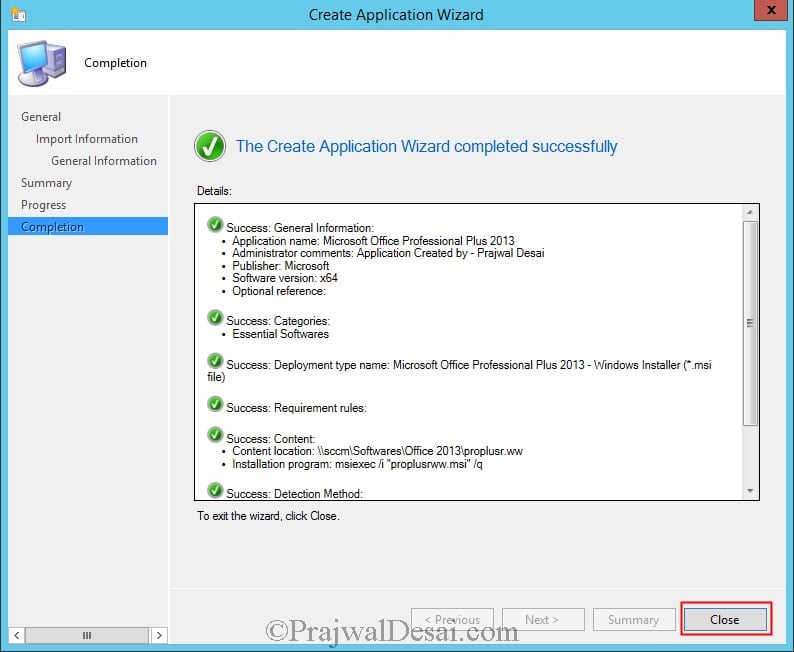
The Application has been created successfully. Click Close.
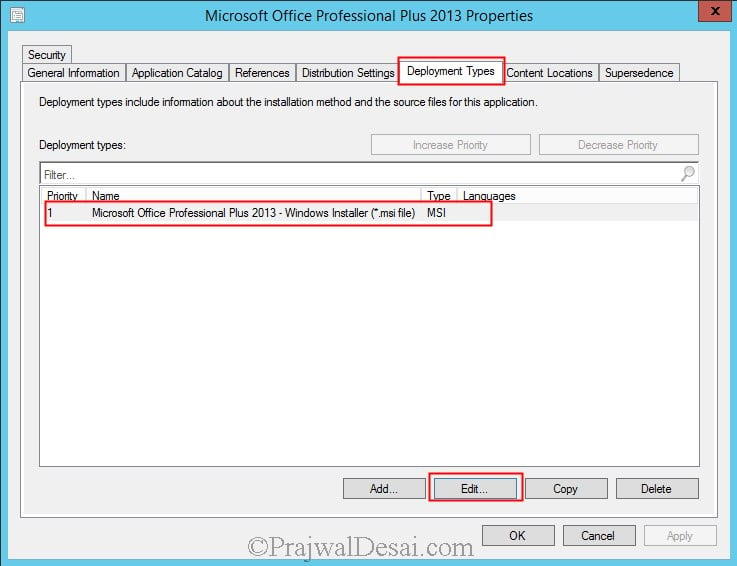
Right click the Office 2013 application, click on Properties.

Click on Deployment Types tab, click on the msi file and click Edit.
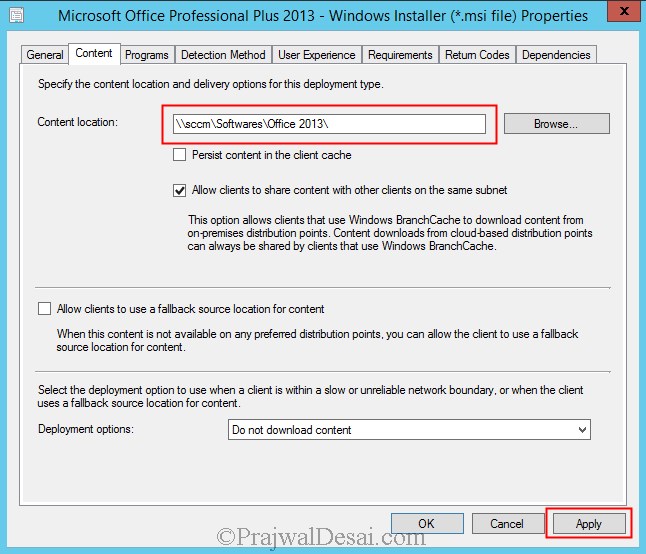
Click on Content tab, set the Content location to Office 2013 folder ( or a folder where Office 2013 installation files are present, remove proplusr.ww after Office 2013 ). Click on Apply.
We will also create a .xml file that will help us in uninstalling the Office 2013. Open Notepad and paste the below lines.
<Configuration Product=”ProPlusr”>
<Display Level=”basic” CompletionNotice=”yes” SuppressModal=”yes” AcceptEula=”yes” />
</Configuration>
Save the file as Uninstall.xml in the folder proplusr.ww (you can choose any filename, only the extension should be .xml)

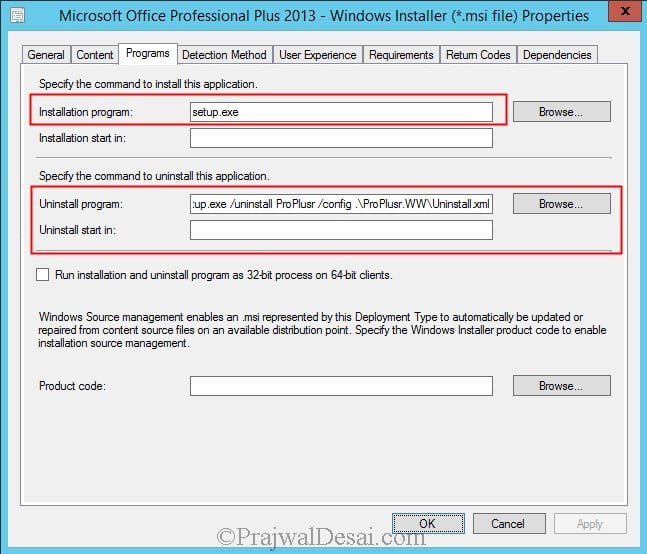
Click on Programs tab, change the Installation Program command to setup.exe, change the Uninstall program command to setup.exe /uninstall ProPlusr /config .ProPlusr.WWUninstall.xml
Click on Apply and OK.
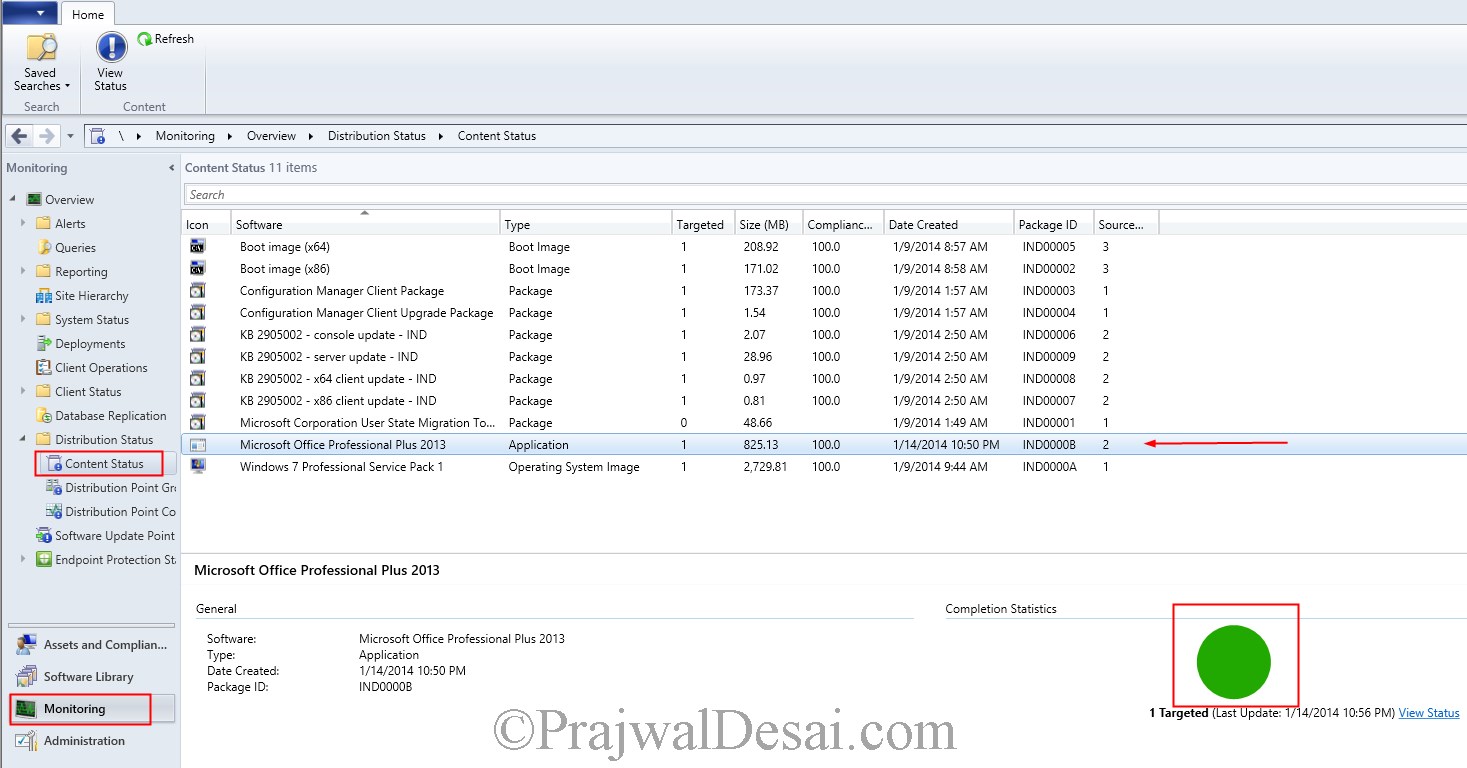
The next step is to make the application available to DP. Right click the Office 2013 application, click on Distribute Content, choose you DP and wait until the application is available with DP. You can verify this by checking the Content Status of the Office 2013 application under Distribution Status.
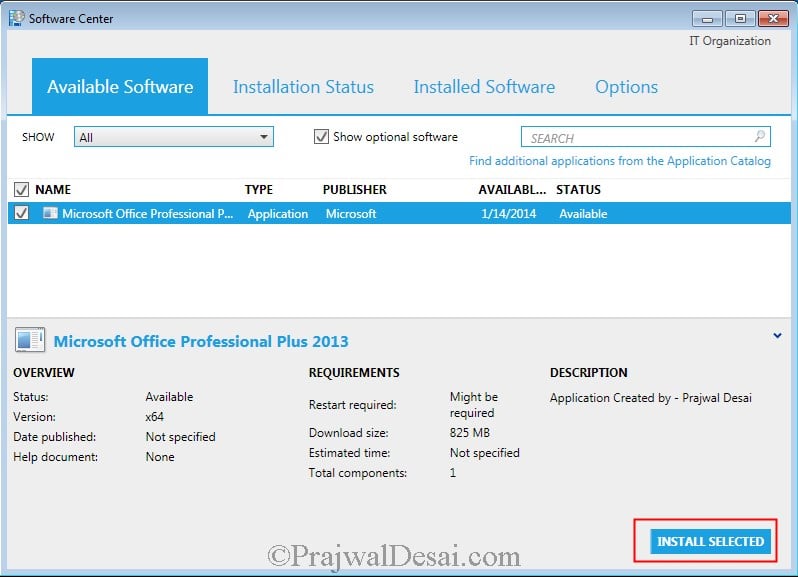
Deploy the Office 2013 application to the collection. Right click on the Office 2013 application and click on Deploy. Choose the Device Collection and choose the Action as Install and Purpose as Available. (I haven’t covered the screenshots of deploying application as it’s simple to deploy an application to collection).
After few minutes, on the client computer we see that the application is available. Select the software and click on Install Selected.
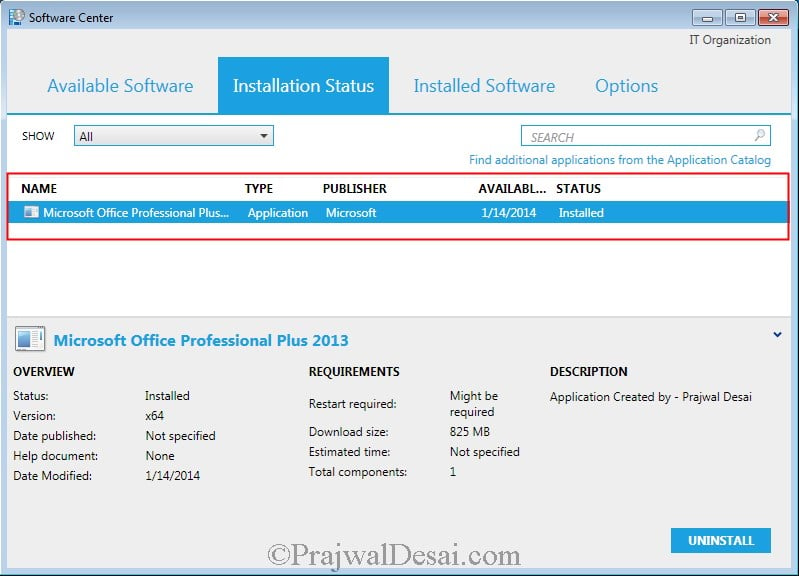
The application is first downloaded to the client computer and then installed. We now see that the application is installed successfully.
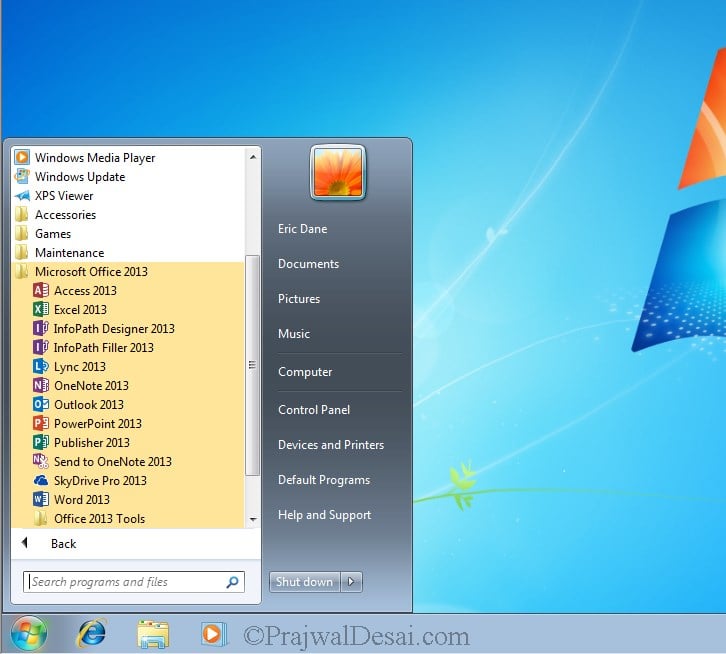
On the client machine we see Microsoft Office 2013 as installed program.
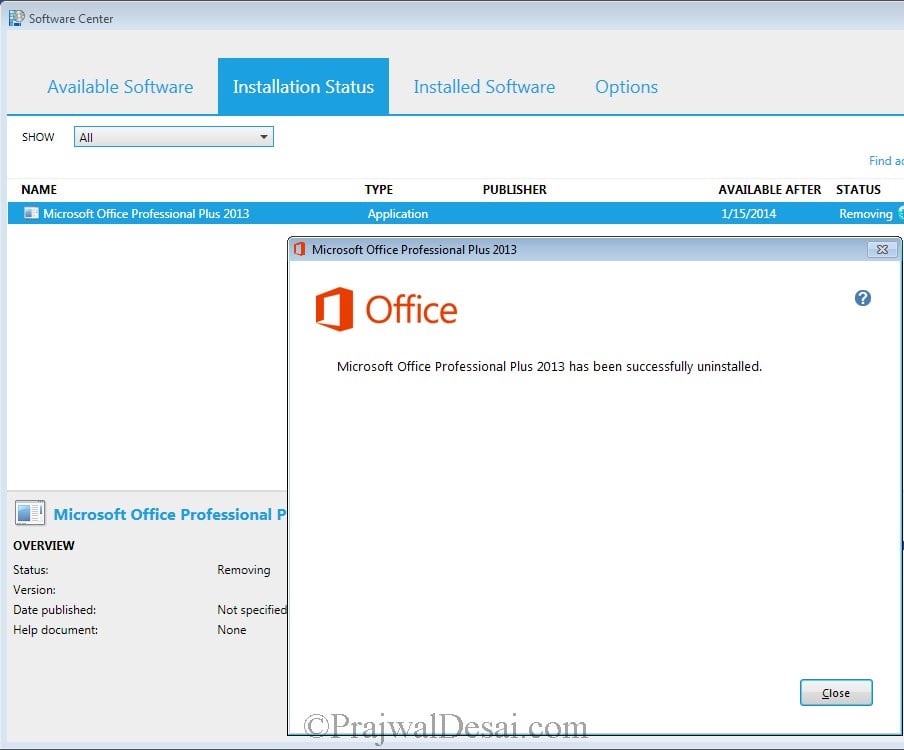
Lets try uninstalling the Office 2013 suite, to uninstall the app click on Uninstall. You will see the status as Removing. Since we had configured the uninstall command for this application, the uninstall process goes smoothly.

Finally we see that Microsoft Office Professional Plus 2013 has been successfully uninstalled. You can again install the application if you need it.

hii sir but i cant see my application on client pc
Dear Prajwal,
Thanks for your article, it solve my problem. I have been spending month to try uninstall Office Pro Plus 2013 from SCCM. But after reading your post and follow it. I complete this task by just half an hours. Very thanks for your sharing. However, I notice there are some thing it might helpful for other.
1) Uninstall.xml should be create before create application package in SCCM console, else the uninstall.xml will not be download. I getting this error unable to found uninstall.xml if I follow your step, but i try to re create the application after the uninstall.xml done and it finally working.
2) proplusr.ww. Not everyone .msi is in proplusr.ww. Like my case it is located in proplus.ww. So i need to change the path to proplus.ww instead of proplusr.ww.
That is the problem I notice.
Again thanks alot for your article, is very useful!
There is an error in this procedure. When removing the ‘proplus.ww’ line in the Content tab, the content cannot be found. On the client you will see errors in the AppEnforce.log similar to:
Unable to locate or validate MSI package proplusww.msi and:
Package file in the commandline is not valid or not accessible
I will leave it in and try again.
how was the oct configuration used in your sccm deployment? I don’t see the connection
Hi Prajwal,
Thanks for detailed steps,
In my environment office 2013 is already in packaged and some of the users are having.
Let say 500 users are having out of 2500 users. so we are now planning to upgrade all the remaining users to office 2013 version.
After installing Office 2013, machines will scan and get the office 2013 updates from sccm as we’re adding this in our patching group. This will most likely spend more time downloading and installing updates than they did the initial installation.
So is there anyway to add all the Office 2013 updates into this?
i got 0x87D01106 error during instalation, help me pls!
Hi,
Is there any way to pushing out desktop shortcut when deploying application?
HI, a great site by the way. by design and content. i would like to know that, if I want to upgrade from office 2007 to office 2013 via sccm how would i do that ? i am guessing the same tutorial as above with some extra modification of removing existing office version ??
Thanks in advance.
https://www.prajwaldesai.com/how-to-deploy-lync-2013-client-using-sccm/
Hi Prajwal,
What about lync 2013 deployment with sccm 2012 r2?
Hello Prajwal,
Is it possible to select only Excel, power point, outlook and word to install. I dont want to install all the office components.
Regards,
Santhosh B S
I guess if you are using OCT, you can choose what to install and what all to exclude.
i checked “https://technet.microsoft.com/en-us/library/cc178960.aspx?f=255&MSPPError=-2147217396” and there is a line which says “For applications that you do not want to install, set the installation option to Not Available in the details pane” but when i checked the client machine’s i see all the components.
Hello Prajwal,
Nice article. I noticed a “” missing in your post. Please correct it.(setup.exe /uninstall ProPlusr /config .ProPlusr.WWUninstall.xml).
I followed your post to install the office 2013 and i could see it installed in all programs and in appwiz.cpl but in AppEnforce.log i see “Unmatched exit code (2902) is considered an execution failure.”
Client machine is Win 10 64 Bit
Am i missing anything?
Regards,
Santhosh B S
Hi Santosh, the “” was missing due to a plugin issue which is resolved now. I just need to update that in all posts. Is it 32 bit / 64 bit office that you are deploying ?.
its 64 bit
Hi Prajwal,
I have deployed office 2013 as per your instructions but still it is not deploying MS office on client machines.
::::::::::::::::::::::::::::::::::::::::::::::::::::::::::::::::::::::::::::~ $$
Site Server Name “\Systemcenter.Arham.com” $$
Site Code “KHI” $$
CCM Account 1 “ARHAMAdministrator” $$
CCM Account 2 “” $$
Max CCR Processing Threads 10 $$
CCR Processing Thread Timeout 600000 ms $$
Sitewide Travel Mode Switch USE CLIENT SETTING $$
Days Between Account Cleanups 30 $$
::::::::::::::::::::::::::::::::::::::::::::::::::::::::::::::::::::::::::::~ $$
Parameters for queue: “Incoming” $$
Inbox Path “C:Program FilesMicrosoft Configuration Managerinboxesccr.box” $$
Read Queue Every DIR CHANGE NOTIFICATION $$
Retry CCR For 168 Hours $$
Report Error After ERROR REPORTING OFF $$
Warn when Queue Exceeds 100 CCRs $$
Delay Between CCRs 100 Millisec $$
::::::::::::::::::::::::::::::::::::::::::::::::::::::::::::::::::::::::::::~ $$
Parameters for queue: “Retry” $$
Inbox Path “C:Program FilesMicrosoft Configuration Managerinboxesccrretry.box” $$
Read Queue Every 60 Minutes $$
Retry CCR For 168 Hours $$
Report Error After 24 Hours $$
Warn when Queue Exceeds 150 CCRs $$
Delay Between CCRs 100 Millisec $$
::::::::::::::::::::::::::::::::::::::::::::::::::::::::::::::::::::::::::::~ $$
Parameters for queue: “Processing” $$
Inbox Path “C:Program FilesMicrosoft Configuration Managerinboxesccr.boxInProc” $$
Read Queue Every DIR CHANGE NOTIFICATION $$
Retry CCR For CCR DOESN’T EXPIRE $$
Report Error After ERROR REPORTING OFF $$
Warn when Queue Exceeds 150 CCRs $$
Delay Between CCRs 0 Millisec $$
::::::::::::::::::::::::::::::::::::::::::::::::::::::::::::::::::::::::::::~ $$
Moving CCRs from processing queue to incoming queue~ $$
Started Incoming Queue Thread, ThreadId = 12A8 $$
Started Retry Queue Thread, ThreadId = 12AC $$
Sleeping for 300 seconds… $$
THREAD_ProcessQ starting, Input Queue ID is 1. $$
Queue Name is “Retry”. $$
Queue Directory is “C:Program FilesMicrosoft Configuration Managerinboxesccrretry.box”. $$
Sleeping for 480 seconds before processing requests on queue Retry… $$
THREAD_ProcessQ starting, Input Queue ID is 0. $$
Queue Name is “Incoming”. $$
Queue Directory is “C:Program FilesMicrosoft Configuration Managerinboxesccr.box”. $$
Sleeping for 300 seconds before processing requests on queue Incoming… $$
~Waking up for site control file directory change notification $$
The Site Control File has not changed since the last parameter update. $$
Updating Site Parameters $$
~MP Ports: 80 $$
~IISPreferedPort: 80 $$
~MP SSL Ports: 443 $$
~IISSSLPreferedPort: 443 $$
~Default MP: Systemcenter.Arham.com $$
~Default MP Type: 1 $$
~Default MP: [None] $$
~Certificate Selection Criteria: $$
~Certificate Store: $$
~SSL State: 224 $$
~Select First Certificate: 1 $$
~Certificate Issuers: $$
Checking configuration information for server: SYSTEMCENTER.ARHAM.COM.~ $$
Checking configuration information for server: SYSTEMCENTER.ARHAM.COM.~ $$
~Fallback Status Point: Systemcenter.Arham.com $$
~Install on DC: False $$
~Option for installing using IP address: 0 $$
Sleeping for 223 seconds… $$
Getting a new request from queue “Incoming” after 100 millisecond delay. $$
Waiting for change in directory “C:Program FilesMicrosoft Configuration Managerinboxesccr.box” for queue “Incoming”, (30 minute backup timeout). $$
CCR count in queue “Incoming” is 0. $$
CCR count in queue “Processing” is 0. $$
Sleeping for 300 seconds… $$
Getting a new request from queue “Retry” after 100 millisecond delay. $$
Sleeping for 60 minutes for queue “Retry”. $$
CCR count in queue “Retry” is 0. $$
Sleeping for 677 seconds… $$
The Site Control File has not changed since the last parameter update. $$
Updating Site Parameters $$
~MP Ports: 80 $$
~IISPreferedPort: 80 $$
~MP SSL Ports: 443 $$
~IISSSLPreferedPort: 443 $$
~Default MP: Systemcenter.Arham.com $$
@Nabil – Please post the questions in community forums.
Hi Prajwal,
I have followed all the steps as told by you, but in windows installer, it s asking for .msi files intead of setup.exe and uninstall.xml. kindly guide me the way through.
thanks a lot!!!!
While you create new app you need to Choose Automatically detect information and provide the path to file proplusrww.msi. The installation program command should be changed later from existing msi to exe. Click on Programs tab, change the Installation Program command to setup.exe, change the Uninstall program command to setup.exe /uninstall ProPlusr /config .ProPlusr.WWUninstall.xml – https://www.prajwaldesai.com/wp-content/uploads/2014/01/How-To-Deploy-Microsoft-Office-2013-Using-SCCM-2012-R2-Snap18.jpg
I also get “Cannot find the Specified Config.xml file. C:windowsccmcachepProplus.WWUninstall.xml” when uninstalling
Getting same error as previous posters.
When i try to uninstall the Office 2013 with Software Center. It’s getting failed.
“Cannot find the Specified Config.xml file. C:windowsccmcachepProplus.WWUninstall.xml”
I noticed the uninstall.xml is not copied to ccmcache folder. Why is this?
I need to uninstall software applications from SCCM, you can guide me how?, please guide me.
Any specific app that you need to uninstall ?.
Hi, I need to distribute the package as zero touch method, i need to deploy to 100 machines in that case i don’t want to go every system and initiate App install from Application catalogue. Do you have any post for automated package push method ?
In that case under app deployment options, choose required instead of available.
Great post! Worked perfectly! Is there a way to have it automatically activate without the user seeing the window prompt to activate on first use?
If there is a KMS server setup, it will take care of the activation.
This is a great post with great screenshots. I have one question though. Why is it no one ever posts detection rules? Do SCCM admins not use detection rules when deploying software to their users? This software will always show as being available even after being installed. I was hoping to see what detection rules people are using to handle the multitude of possible versions of Office out there. I can’t believe how difficult Microsoft makes it to determine the version of Office installed.
@notta – Detection rules are important and used very often. In my upcoming posts I will surely show how detection rules are useful.
Hi Prajwal .
i get this problem from distmgr.log when i distribute the content 🙁
This worked like a DREAM. I’m installing Office 2013 Standard, so I had to change up a few things, but I followed your instructions to the letter and it worked. It even uninstalled Office 2010 Standard. Thanks for the great step by step documentation!
Thank you mmincey.
i tried this and after the reboot of the test system i have office 2013 but right above it in my start menu is “microsoft office” and inside it is Microsoft Sharepoint workspace 2010, Microsoft Office 2010 Tools, and Microsoft Office Tools” i thought those were supposed to be uninstalled too?? if not how can o make them uninstall during this process as well??
Hi. Love all your articles. One quick question. If I only have retail keys (qty 5), do I need to create a separate application in SCCM for each key? Thanks
Hi Prajwal,
Thanks for your awesome posts. I’ve learned a lot.
I was trying to deploy Office 2013, through SCCM 2012 R2. Office 2013 appears on the Software center, but installation is failed when I try to install it. What could be the cause of it or how diagnose this issue ?
Thanks in advance!
What is the error that you see ?. Make sure the computer is able to connect to DP to download the package/app. Could you tell me the error code / post the screenshot.?
I figured out the previous error, I didn’t put the *.msp file on the “Updates” folder.
Now receiving the below issue. The client PC is able to ping to SCCM server, anything else to be checked ?
That’s strange, can you try uninstalling again.
Hi Prajwal, Greetings!!!
I have deployed Office 2013 with SCCM2012R2. It’s installed perfect. When i try to uninstall the Office 2013 with Software Center. It’s getting failed.
“Cannot find the Specified Config.xml file. C:windowsccmcachepProplus.WWUninstall.xml”
Please guide to me.
Hi Prajwal, Greetings!!!
I am new in System Center. I am following your blogs (SCCM), It’s an excellent guide for me. I have deployed the Office 2013 installation with SCCM 2012R2. It’s perfect. When i try to uninstall, It’s getting error. “Remove Failed”. Cannot find the Specified Config.xml file. C:windowsccmcachepProplus.WWUninstall.xml.
Please guide me.
@Markus – You will have to uninstall Lync 2010 and install only Lync 2013 using the script. I have done this in my company and I shall post this soon on my website.
Hi
we need to continue using Office 2010 ProPlus, therefore I want to deploy only Lync 2013 from the Office 2013 ProPlus.
How can I do this. When I try “it” always removes Office 2010.
I know but it usually takes too much time to post some updates since I am solving issue by issue. I can not uninstall Office 2013 from Software Center on client machine nor manually with command: setup.exe /uninstall ProPlus /config .ProPlus.wwUninstall.xml in c:Windowsccmcache1 folder on client machine. I got an error telling me that Setup can not find or validate an installation file. Please try reinstalling Office from your installation source . . . I only changed ProPlusr with ProPlus in Uninstall.xml file since it is my product name.
I installed all subfeatures of .net 3.5 and 4.5 this morning. Will I have any problem with SCCM because of this “postinstall” action? I assume reinstalling SCCM from scratch again is not necessary, otherwise I would be unpleasantly surprised.
Do you have some email or other way to contact you? I posted some questions and they have dissapeared from here.
@Bojan – The comments have not disappeared. I approve the comments manually to avoid SPAM.
I deployed Office successfully but I am unable to uninstall it. Error is: Setup can not find or validate an installation file. Please try reinstalling Office from your installation source . . .
Today I tried to deploy Office 2013. Having done all the steps you depicted above I deployed Office 2013 to test collection with one machine as a member. However in Software Center on client machine Available Software list is empty and when I click on link Find additional applications from the Application Catalog I receive an error: Cannot connect to the application server. The website cannot communicate with the server. This might be a temporary problem. Try again later to see if the problem has been corrected. If this problem continues, contact your help desk.
I do not want to try anything from untrusted sources on the net. I found that in smsawebsvcsetup.log some info can be found and error is very common: Checking whether WCF is activated, WCF is not activated, Installation failed Error Code 123. Unfortunately I found out I did not install all subfeatures of .net 3.5 and 4.5 and I did this a few minutes ago. Can this cause any problem with SCCM 2012 R2? Prerequisite check did not tell me I did not install all these subfeatures. What to do now? I can not believe I did not see your comment in brackets INSTALL ALL SUBFEATURES for .net 3.5 and 4.5.
@Bojan – Yes you must install all the prerequisites as mentioned in my post else you will face errors like the one you are facing.
hello Prajwal
I have a query, to create client implementation and not installed, only appears (Installation in progress) that problem and I have to correct.
regards
@Miguel – Do you want to say that the client installation is unsuccessful ? Please provide some more details.
Thanks very much for this post Prajwal this worked correctly for me!!!
Welcome Guyrault 🙂
Thanks for these great articles. I would like to share that “Uninstall functionality does not work without Cumulative Update1 for SCCM 2012 r2”.
Hi Selim, may i know any errors that you encounter during uninstallation ?
hello! very good post!
doubt, as I do for installation of office Pro Plus 365?
Hello Prajwal, Your site is very helpful
Would you please write a post for deploying MS Lync 2013 ?
because it is not working with me
Thank you very much
By the way i love your site its great
In your post what do we do with the custom_setting we created where do we add this to the package maybe i missed something????
do we add the custom setting inside the application office 2013 folder and then package it?
the custom_settings.msp file must be placed in Updates folder. The Updates folder can be found in the office 2013 setup folders.
Hi dude, very nice post!,
I have a problem during the installation, somewhere in the middle of the installation the installer stops displaying the following message:
“Setup cannot find Lync.en-us\LyncMUI.msi. Browse to a valid installation source and then click OK.”
But I reviewed the target folder and the msi file that the installer needs is present in that target folder, so I don’t how to fix this because the installation cannot be completed.
Did you see this error before?
Thank you
Daniel C.
Check the installation media once again..
Hi, good guide, thanks!
I have a question: We have deployed just Lync 2013 using the OCT. Now, we wish to deploy all of Office 2013, but the deployment fails as it think Office 2013 is already in place, it promts for userinteraction (repair/remove etc). Do you have a solution for this, preferably without having to uninstall Lync 2013?
You can deploy office 2013 without having lync 2013 selected. Or you can uninstall the lync from the systems and then deploy Office 2013.
Thanks for the helpful guide. It is very clear and easy to follow. One question i have is how do we deal with office updates? Say for example a new SP came out. How can we go about doing this?
Thanks
You can deploy the office service pack as a package using SCCM..
Well that issue is now fixed. I changed the OU and applied a driver package to the task sequence. Our image is now working correctly. Thanks.
I can provide another OU. Why can’t I use Computers OU? Is there just an issue when trying to add the computers there.
I have seen in SCCM Technet forums regarding this issue, the computers fail to join to the COMPUTERS OU. The reason is not yet known.
Yes it is the Computers OU.
How do you add drivers to the task sequence (OSD)? I added drivers to the boot image for the system that we are trying to image thinking that would fix the problem but it didn’t.
Can you provide another OU instead of Computers OU ?
I updated my previous comment
Prajwal
I just wanted to let you know that your posts on SCCM are outstanding. Helped me through the new build of our SCCM 2012 R2 server. I have a couple of questions.
1.) When deploying Office with SCCM, can’t you have the software automatically install to the client.
2.) We are trying to create and push images to our clients. We are close but a couple of issues have been bothering me. One is that when I create the image, it seems to strip some of the system drivers, like the video card driver. The other is when we push the client, we set the task to add the client to the domain but it never does.
Any suggestions.
Thanks.
Thank you Mark, I am just trying to help people with deploying SCCM.
1) When you distribute an app to DP you make it available to DP so that clients can download the content from DP. If you want to install the application you have to deploy the application. when you deploy you come across 2 options. a) Available – If the application is deployed to a user, the user sees the published application in the Application Catalog and can request it on demand. If the application is deployed to a device, the user will see it in the Software Center and can install it on demand. b) Required – The application is deployed automatically according to the configured schedule. However, a user can track the application deployment status if it is not hidden, and can install the application before the deadline by using the Software Center.
So if you want to install the software automatically as per the schedule you can choose Required option.
2) Have you added the video card drivers ? You can create a package and deploy it to the collection. When you deploy the OS image to the client via SCCM, the task sequence has a section where you can choose to join the client to the domain, to enter user account and password and OU, I am sure you would have provided the user account that has enough permissions to join the client to the domain. I want to know what OU have specified in the task sequence ? Is it COMPUTERS OU (LDAP://CN=Computers,DC=mydomain,DC=com) ?
Hello Prajwal, Your site is amazing.
Your posts on System Center Configuration Manager are excellent,thanks for this website
Thank you !!!
Thank you Ashish…